Pass Microsoft Certified: Azure Security Engineer Associate Certification Exam in First Attempt Guaranteed!
Get 100% Latest Exam Questions, Accurate & Verified Answers to Pass the Actual Exam!
30 Days Free Updates, Instant Download!


AZ-500 Premium Bundle
- Premium File 515 Questions & Answers. Last update: Jun 22, 2026
- Training Course 73 Video Lectures
- Study Guide 635 Pages
AZ-500 Premium Bundle
- Premium File 515 Questions & Answers
Last update: Jun 22, 2026 - Training Course 73 Video Lectures
- Study Guide 635 Pages
Purchase Individually
Premium File
Training Course
Study Guide


AZ-500 Exam - Microsoft Azure Security Technologies
| Download Free AZ-500 Exam Questions |
|---|
Microsoft Microsoft Certified: Azure Security Engineer Associate Certification Practice Test Questions and Answers, Microsoft Microsoft Certified: Azure Security Engineer Associate Certification Exam Dumps
All Microsoft Microsoft Certified: Azure Security Engineer Associate certification exam dumps, study guide, training courses are prepared by industry experts. Microsoft Microsoft Certified: Azure Security Engineer Associate certification practice test questions and answers, exam dumps, study guide and training courses help candidates to study and pass hassle-free!
The Foundation of a Microsoft Certified: Azure Security Engineer Associate
The global shift towards cloud computing has fundamentally reshaped the landscape of information technology. Businesses of all sizes are migrating their critical infrastructure, applications, and data to platforms like Microsoft Azure to leverage scalability, efficiency, and innovation. However, this migration introduces a new paradigm for security. The traditional perimeter-based security model is no longer sufficient. In its place, a more dynamic, identity-centric, and data-aware approach is required. This is the world of the cloud security professional, a domain where the Microsoft Certified: Azure Security Engineer Associate plays a pivotal role, acting as a guardian of digital assets in this complex and ever-evolving environment.
This series will guide you through the comprehensive journey of becoming a Microsoft Certified: Azure Security Engineer Associate. We will dissect the role, explore the core competencies required, and provide a structured path to mastering the necessary skills. The demand for qualified Azure security engineers has never been higher, as organizations recognize that a robust security posture is not just a technical requirement but a fundamental business imperative. A breach in the cloud can have devastating consequences, leading to financial loss, reputational damage, and regulatory penalties. Consequently, companies are investing heavily in professionals who can navigate the intricacies of cloud security and implement effective defenses.
The role of an Azure Security Engineer Associate is multifaceted. It involves designing, implementing, and managing security controls across an organization's Azure environment. This includes protecting identity and access, securing network infrastructure, safeguarding data and applications, and managing security operations. It requires a deep understanding of Azure services and a security-first mindset. This initial part of our series lays the groundwork, exploring the core responsibilities of the role and the foundational knowledge you need to begin your journey. We will delve into why this career path is so crucial in today's digital economy and what it takes to build a successful career.
Embarking on this path means committing to continuous learning. The cloud and the threat landscape are in a constant state of flux, with new services being introduced and new attack vectors emerging regularly. A successful security engineer is one who is adaptable, curious, and proactive. The Microsoft Certified: Azure Security Engineer Associate certification is a testament to your ability to meet these challenges. It validates your skills and demonstrates to potential employers that you have the expertise required to secure their cloud investments. Let's begin by exploring the fundamental pillars upon which a successful career in Azure security is built.
Understanding the Role of an Azure Security Engineer
The Microsoft Certified: Azure Security Engineer Associate is a front-line defender in the cloud. This professional is responsible for maintaining the security posture of an organization's Azure workloads, implementing security controls, and protecting against cyber threats. Their daily tasks are a blend of proactive implementation and reactive response. They work closely with administrators, developers, and other IT professionals to ensure that security is integrated into every stage of the cloud lifecycle. This is not a siloed role; it is a collaborative one that requires strong communication skills and the ability to influence others to adopt security best practices.
A key responsibility is the implementation of threat protection. This involves configuring and managing a suite of Azure security tools to detect, investigate, and respond to threats. The engineer must understand how to leverage services like Microsoft Defender for Cloud to gain visibility into the security state of resources and to receive and act upon security recommendations. They are tasked with hardening resources, which means reducing the attack surface by applying security baselines, disabling unnecessary services, and ensuring that configurations adhere to organizational policies and industry standards. This proactive stance is crucial for preventing security incidents before they occur.
Furthermore, the engineer manages identity and access. In a zero-trust world, identity is the new perimeter. The Azure Security Engineer Associate must be proficient in using Azure Active Directory (Azure AD) to control access to resources. This includes configuring multi-factor authentication (MFA), implementing Conditional Access policies, and managing user identities and group memberships. They ensure that the principle of least privilege is applied, granting users only the permissions they need to perform their job functions. This granular control is essential for preventing unauthorized access and limiting the potential impact of a compromised account.
Finally, the role encompasses the management of security operations. This involves monitoring security events, analyzing security logs, and responding to incidents. The engineer uses tools like Microsoft Sentinel, a cloud-native Security Information and Event Management (SIEM) solution, to collect and analyze security data from across the enterprise. When a security alert is triggered, they are responsible for investigating the incident, determining its scope, and taking remedial action. This operational aspect of the role is critical for ensuring a swift and effective response to security threats, minimizing damage, and restoring normal operations.
Core Azure Services for Security Professionals
To secure an environment, you must first understand its components. For a Microsoft Certified: Azure Security Engineer Associate, a solid understanding of core Azure services is non-negotiable. This foundational knowledge allows you to identify potential security risks and apply the appropriate controls. At the heart of Azure is its compute services, primarily Azure Virtual Machines (VMs). You need to understand how VMs are deployed, managed, and secured. This includes knowledge of VM extensions, update management, and disk encryption. Securing the compute layer is a fundamental aspect of protecting the workloads that run on it.
Storage is another critical area. Azure provides various storage solutions, including Blob Storage for unstructured data, File Storage for shared file systems, and Table Storage for NoSQL data. Each of these services has its own set of security features and considerations. A security engineer must know how to secure storage accounts by controlling network access, managing access keys, and enabling encryption for data at rest. Understanding Shared Access Signatures (SAS) and their proper use is also crucial for providing temporary, delegated access to storage resources without exposing account keys.
Networking is the connective tissue of the Azure environment. A deep understanding of Azure Virtual Networks (VNets) is essential. You must be familiar with concepts such as subnets, network security groups (NSGs), and routing. NSGs are a fundamental tool for controlling inbound and outbound traffic to Azure resources, acting as a distributed virtual firewall. You need to know how to create and apply NSG rules effectively to enforce network segmentation and isolate workloads. Understanding how to deploy and configure Azure Firewall for more advanced network protection is also a key skill.
Finally, you must be well-versed in Azure's identity and access management service, Azure Active Directory (Azure AD). As mentioned earlier, identity is a core pillar of cloud security. Azure AD is the foundation for managing users, groups, and application access. A security engineer must understand the different editions of Azure AD and their features. This includes knowledge of Azure AD Identity Protection, which provides risk-based policies to protect against identity compromise, and Privileged Identity Management (PIM), which enables just-in-time access to administrative roles. Mastering Azure AD is fundamental to securing the entire Azure ecosystem.
The Importance of IT Governance Principles
IT governance provides the framework for aligning IT strategy with business strategy. For a security professional, it establishes the policies, standards, and processes that guide security decisions and ensure that security efforts support business objectives. A Microsoft Certified: Azure Security Engineer Associate does not operate in a vacuum. Their actions are governed by the organization's IT governance framework. This framework helps to ensure consistency, accountability, and compliance with regulatory requirements. Understanding these principles is crucial for implementing security in a way that is both effective and aligned with the broader goals of the organization.
One of the key principles of IT governance is risk management. This involves identifying, assessing, and mitigating risks to an acceptable level. An Azure security engineer plays a direct role in this process by implementing controls to mitigate security risks. They use tools like Microsoft Defender for Cloud to identify vulnerabilities and misconfigurations, which are sources of risk. By remediating these issues, they reduce the organization's risk exposure. The engineer must be able to articulate security risks in business terms, helping stakeholders understand the potential impact of a security incident and the value of security investments.
Compliance is another critical aspect of IT governance. Many organizations are subject to industry regulations and data protection laws, such as the General Data Protection Regulation (GDPR) or the Health Insurance Portability and Accountability Act (HIPAA). The Azure security engineer must understand the compliance requirements relevant to their organization and implement controls to meet them. Azure provides a range of tools and resources to help with compliance, including Azure Policy and compliance blueprints. The engineer uses these tools to enforce compliance standards and to generate reports that demonstrate adherence to regulatory requirements.
Finally, IT governance encompasses resource management. In the context of security, this means ensuring that security resources are used effectively and efficiently. The Azure security engineer is responsible for managing and optimizing the use of Azure security services. This includes monitoring costs, evaluating the effectiveness of security controls, and making recommendations for improvement. By applying sound governance principles, the engineer can ensure that the organization's security program delivers maximum value and provides a strong return on investment. This business-centric approach to security is a hallmark of a mature and effective security professional.
Building Foundational Networking Skills
A robust understanding of networking concepts is a cornerstone for any Microsoft Certified: Azure Security Engineer Associate. The cloud is, at its core, a network of interconnected resources. Securing this network is paramount to protecting the assets within it. Before you can master Azure-specific networking, you need a firm grasp of fundamental networking principles. This includes understanding the OSI model, TCP/IP protocol suite, IP addressing, and subnetting. These concepts are the building blocks upon which all network security is based. Knowing how data flows across a network is the first step in learning how to protect that flow.
In Azure, the virtual network, or VNet, is the primary building block for your private network. It enables Azure resources like VMs to securely communicate with each other, the internet, and on-premises networks. As a security engineer, you will spend a significant amount of time working with VNets. You must understand how to design and implement a secure VNet architecture. This includes proper address space planning and the use of subnets to segment the network. Network segmentation is a critical security practice that limits the lateral movement of an attacker in the event of a breach.
Network Security Groups (NSGs) are your first line of defense for controlling traffic in a VNet. An NSG is a stateful firewall that contains a list of security rules that allow or deny network traffic to resources. You must become an expert in crafting NSG rules. This requires a detailed understanding of how rules are processed, including priority, source and destination, and protocol. A misconfigured NSG rule can either leave a resource exposed to attack or block legitimate traffic, causing service disruptions. Therefore, precision and attention to detail are crucial when working with NSGs.
Beyond NSGs, you should also be familiar with more advanced network security services in Azure. Azure Firewall is a managed, cloud-based network security service that provides centralized protection for your VNets. It offers features like threat intelligence-based filtering and application-level filtering that go beyond the capabilities of NSGs. Understanding when and how to deploy Azure Firewall is a key skill. Additionally, you should be aware of other services like Azure DDoS Protection, which safeguards against distributed denial-of-service attacks, and Web Application Firewall (WAF), which protects web applications from common exploits and vulnerabilities.
Grasping Identity and Access Fundamentals
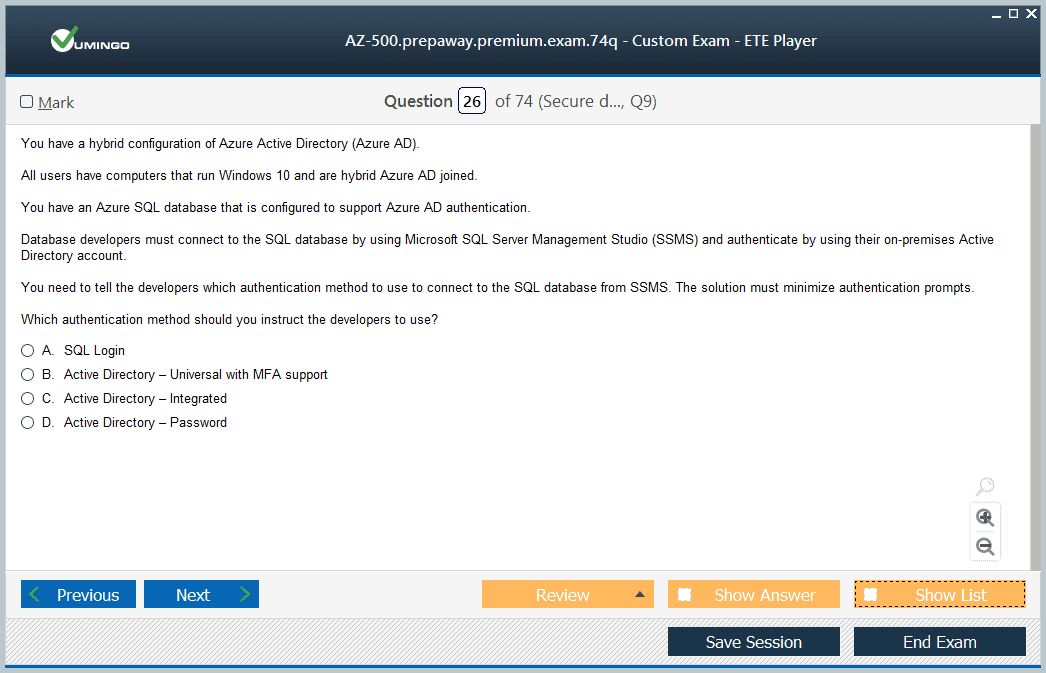
In the modern IT landscape, identity has become the primary security boundary. The concept of a trusted internal network is obsolete. The zero-trust model, which assumes no implicit trust and continually verifies identity, is the new standard. For a Microsoft Certified: Azure Security Engineer Associate, mastering identity and access management (IAM) is not just important; it is absolutely critical. This journey begins with understanding the fundamentals of identity. This includes concepts like authentication, which is the process of verifying who a user is, and authorization, which is the process of determining what an authenticated user is allowed to do.
Azure's identity and access management solution is Azure Active Directory (Azure AD). It is a comprehensive, cloud-based service that provides identity and access capabilities for applications running in Azure and on-premises. You must understand the core components of Azure AD, including users, groups, and application objects. Knowing how to manage the lifecycle of a user identity, from creation to deletion, is a fundamental administrative task. You also need to be proficient in managing group memberships, which are often used to assign permissions to resources in a scalable and manageable way.
A key aspect of securing identities is strengthening the authentication process. Passwords alone are no longer considered a secure method of authentication. Multi-factor authentication (MFA) adds a crucial second layer of security, requiring users to provide two or more verification factors to gain access. As an Azure security engineer, you will be responsible for implementing and enforcing MFA for users. You need to understand the different verification methods available in Azure AD MFA and how to configure policies that require MFA for specific users, applications, or sign-in conditions.
Once a user is authenticated, the next step is to control their access to resources. This is where Role-Based Access Control (RBAC) comes into play. Azure RBAC allows you to grant users the specific permissions they need to perform their jobs. It is based on the principle of least privilege. You must understand the different components of an RBAC role assignment: the security principal (user, group, or service principal), the role definition (a collection of permissions), and the scope (the set of resources the permissions apply to). Mastering RBAC is essential for ensuring that access to Azure resources is tightly controlled and properly governed.
Laying the Groundwork for the AZ-500 Exam
The Microsoft Certified: Azure Security Engineer Associate certification is earned by passing the AZ-500 exam. This exam is designed to measure your ability to accomplish a set of technical tasks related to Azure security. Your entire learning journey should be oriented towards mastering the skills covered in this exam. The exam is broken down into four main functional groups: manage identity and access; implement platform protection; manage security operations; and secure data and applications. A successful preparation strategy involves a deep dive into each of these areas, combining theoretical knowledge with hands-on practice.
To begin your preparation, you should thoroughly review the official AZ-500 exam skills outline provided by Microsoft. This document is your roadmap. It details every topic and subtopic that may appear on the exam. Use this outline to structure your study plan and to track your progress. As you go through each topic, make sure you not only understand the concepts but also know how to implement them in the Azure portal and using command-line tools like Azure PowerShell and the Azure CLI. The exam includes scenario-based questions that test your practical skills, so hands-on experience is vital.
Creating a free Azure account or using a subscription provided by your employer is essential for gaining this hands-on experience. There is no substitute for actually working with the services. Follow along with tutorials, build your own lab environments, and experiment with different security configurations. For example, set up a virtual network with multiple subnets, apply NSG rules, and then test the connectivity between them. Create users in Azure AD, assign them to groups, and then use RBAC to grant them access to specific resources. This practical application will solidify your understanding and build the muscle memory you need for the exam.
In addition to self-study and hands-on labs, consider leveraging other learning resources. Microsoft Learn provides a free, comprehensive learning path for the AZ-500 exam, with modules that cover all the required skills. There are also many high-quality training courses, both free and paid, available from various providers. Practice exams are another invaluable tool. They can help you get a feel for the format and difficulty of the real exam and identify areas where you need to focus your studies. By adopting a structured and multi-faceted approach to your preparation, you can build the knowledge and confidence needed to pass the AZ-500 exam and earn your certification.
The Central Role of Azure Active Directory
In the universe of Microsoft Azure, identity is the sun around which all security revolves. At the core of this system is Azure Active Directory (Azure AD), a comprehensive, cloud-based identity and access management service. It is far more than just a directory of users; it is the control plane for access to all resources, both in the cloud and on-premises. For anyone aspiring to become a Microsoft Certified: Azure Security Engineer Associate, a deep and thorough mastery of Azure AD is not merely a recommendation, it is an absolute requirement. This service is the foundation upon which a secure Azure environment is built.
Azure AD provides a single, unified identity system for managing access to thousands of cloud applications, including Microsoft 365, Azure, and a vast array of third-party SaaS applications. It also integrates with on-premises Active Directory, allowing organizations to create a hybrid identity solution. This enables a seamless single sign-on (SSO) experience for users, regardless of where the application is hosted. As a security engineer, you will be responsible for designing, implementing, and managing this identity infrastructure. Your goal is to ensure that the right people have the right access to the right resources at the right time.
The capabilities of Azure AD are extensive and form a significant portion of the AZ-500 exam objectives. This includes managing user and group lifecycles, implementing robust authentication methods, controlling access through policies, and protecting privileged accounts. Each of these areas requires careful planning and precise execution. A misconfiguration in Azure AD can have far-reaching consequences, potentially exposing sensitive data and applications to unauthorized access. Therefore, a meticulous and detail-oriented approach is essential when working with this critical service.
This part of our series will serve as a deep dive into the identity and access management capabilities of Azure. We will move beyond the fundamentals and explore the advanced features and best practices that a Microsoft Certified: Azure Security Engineer Associate must know. We will dissect the tools and techniques used to protect identities, enforce granular access controls, and govern the identity lifecycle. By the end of this section, you will have a clear understanding of how to leverage Azure AD to build a secure and resilient identity foundation for your organization.
Managing the Identity Lifecycle
The identity lifecycle refers to the entire process of managing a digital identity, from its creation to its eventual deletion. Effective management of this lifecycle is a fundamental aspect of security and governance. A Microsoft Certified: Azure Security Engineer Associate must be proficient in managing user and group objects within Azure AD throughout their entire lifecycle. This process begins with the creation of a new identity. This can be done for employees, contractors, partners, or even system accounts. It is crucial to have a standardized process for onboarding new identities to ensure that they are created correctly and consistently.
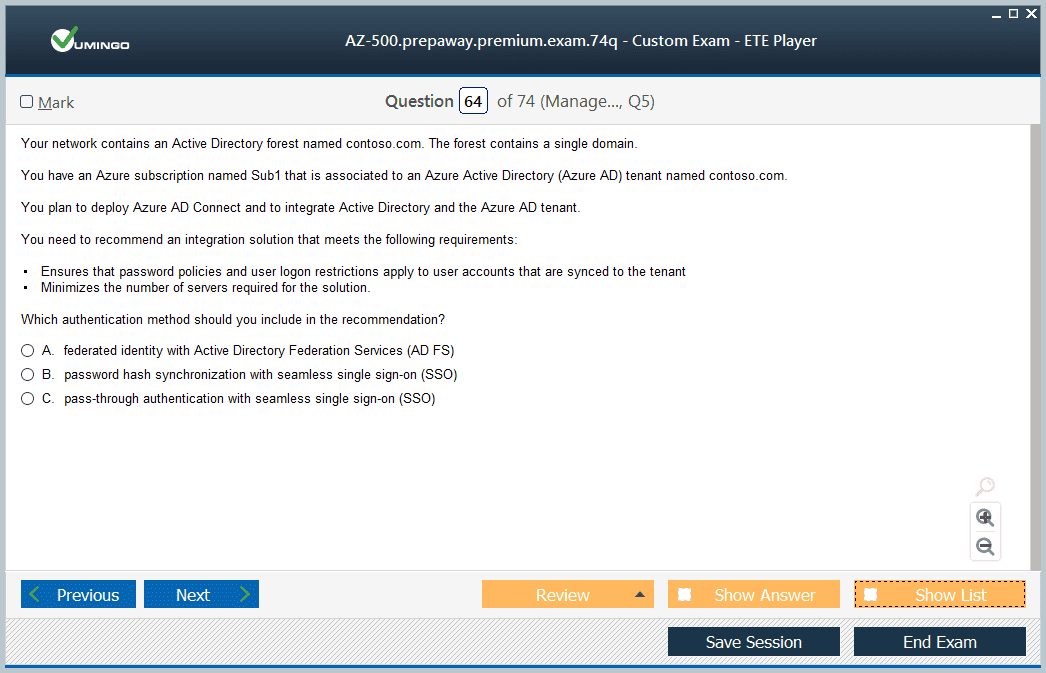
Azure AD provides several methods for creating user accounts. They can be created manually in the Azure portal, in bulk using a CSV file, or programmatically via PowerShell or the Microsoft Graph API. For organizations with an on-premises Active Directory, Azure AD Connect is a key tool. It synchronizes identity objects between the on-premises and cloud directories, creating a hybrid identity. You must understand the different synchronization options and how to configure Azure AD Connect to meet your organization's needs. Proper configuration is essential for ensuring that identities are consistent across both environments.
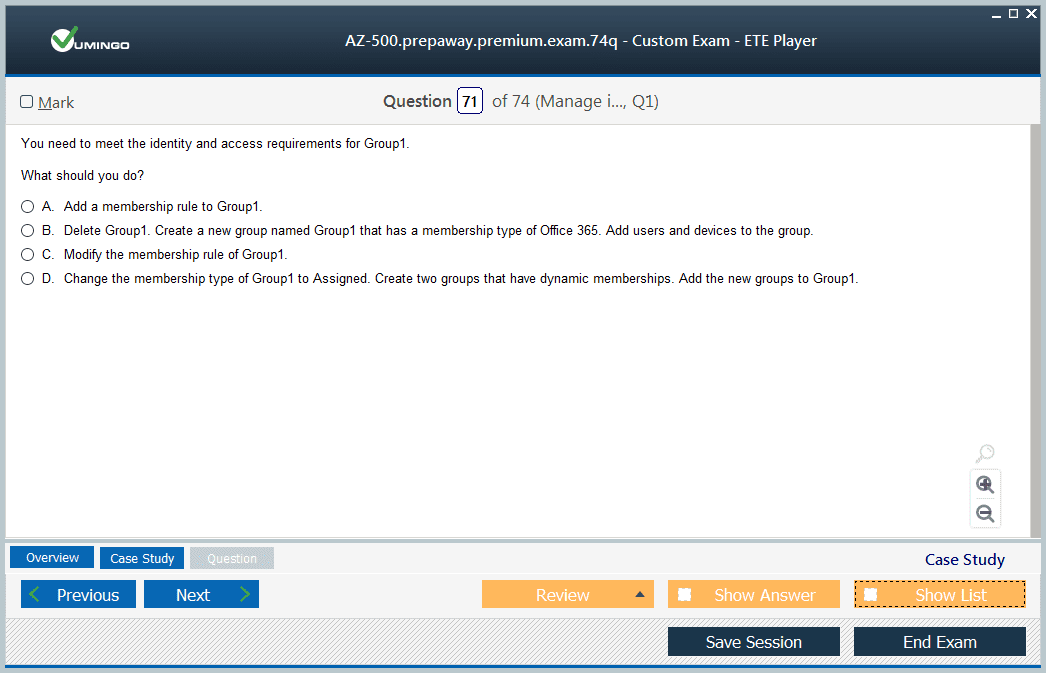
Once an identity is created, it needs to be managed. This includes updating user attributes, handling password resets, and managing group memberships. Groups are a powerful tool for simplifying access management. Instead of assigning permissions to individual users, you can assign them to a group. This makes it much easier to manage access for large numbers of users. Azure AD supports different types of groups, including security groups and Microsoft 365 groups. You need to understand the differences between them and when to use each type. Dynamic groups, which automatically update their membership based on user attributes, can further automate and streamline group management.
The final stage of the identity lifecycle is de-provisioning. When an employee leaves the organization or a contractor's engagement ends, their access must be revoked promptly. A lingering, unused account is a significant security risk. The de-provisioning process should involve disabling the user account, removing it from all groups, and revoking its access to applications. Azure AD Identity Governance features, such as access reviews, can help automate this process. Access reviews enable you to schedule periodic reviews of user access to ensure that it is still required. By implementing a robust identity lifecycle management process, you can significantly improve your organization's security posture.
Strengthening Authentication with MFA
The password has long been the weakest link in the security chain. Passwords can be stolen, guessed, or cracked, providing an easy entry point for attackers. To counter this weakness, multi-factor authentication (MFA) has become an industry standard. MFA adds a critical layer of security to the sign-in process by requiring users to present two or more pieces of evidence, or factors, to prove their identity. A Microsoft Certified: Azure Security Engineer Associate must be an expert in implementing and managing MFA within the Azure AD environment. Enforcing MFA is one of the most effective steps you can take to protect identities.
Azure AD Multi-Factor Authentication supports a variety of verification methods. The most common methods are something you know (like a password), something you have (like a trusted device), and something you are (like a fingerprint or facial scan). The Microsoft Authenticator app is a recommended method as it provides a secure and user-friendly experience, offering both push notifications and one-time passcodes. Other options include SMS text messages, voice calls, and hardware tokens. As a security engineer, you need to understand the pros and cons of each method and guide your organization in choosing the most appropriate options for its user base.
Implementing MFA is not just about turning it on. It requires careful planning and a phased rollout to ensure a smooth user experience. You can enable MFA on a per-user basis, but this approach is not scalable and is no longer recommended. The preferred method for enforcing MFA is through Conditional Access policies. Conditional Access is a powerful feature of Azure AD Premium that allows you to create rules that control access to applications based on a variety of signals. For example, you can create a policy that requires MFA for all users when they access a specific application or when they sign in from an untrusted location.
Conditional Access policies provide a high degree of flexibility and granularity. You can target policies to specific users and groups, applications, and network locations. You can also incorporate device state, requiring that a device be compliant with organizational policies before it can be used to access resources. Another key signal is sign-in risk, which is calculated by Azure AD Identity Protection. You can create a policy that requires MFA or even blocks access if a sign-in is deemed to be risky. Mastering Conditional Access is a crucial skill for an Azure security engineer, as it is the primary tool for implementing a modern, zero-trust security model.
Implementing Conditional Access Policies
Conditional Access is the engine at the heart of Azure AD's zero-trust security model. It acts as a policy-based decision-maker that evaluates various signals during an authentication attempt and then enforces an organizational policy. For a Microsoft Certified: Azure Security Engineer Associate, understanding how to construct and manage Conditional Access policies is a paramount skill. These policies allow you to move beyond simple binary access decisions (allow or deny) and implement more nuanced, risk-aware access controls. This capability is essential for balancing security with user productivity in a modern, mobile-first, cloud-first world.
The structure of a Conditional Access policy is based on an "if-then" statement. The "if" part is the conditions, which are the signals that the policy evaluates. These conditions can include the user or group, the cloud application being accessed, the user's location based on their IP address, the type of client application being used, and the state of the device. You can also use sign-in risk and user risk data from Azure AD Identity Protection as conditions. This allows you to create policies that respond dynamically to the real-time risk level of an authentication attempt.
The "then" part of the statement is the access controls, which are the actions that the policy enforces. The most common control is to grant access, but with a requirement for multi-factor authentication. Other grant controls include requiring the device to be marked as compliant or requiring it to be hybrid Azure AD joined. You can also choose to block access entirely. For example, you might create a policy that blocks access from specific countries or for legacy authentication protocols, which are a common target for attackers. Session controls, such as limiting the sign-in frequency, provide another layer of control.
Creating effective Conditional Access policies requires a thoughtful and strategic approach. You should start by defining your security requirements and then translating them into policies. It is crucial to test your policies thoroughly before deploying them to all users. The "report-only" mode is a valuable tool for this purpose. It allows you to evaluate the impact of a policy without actually enforcing it. You should also be aware of policy precedence and how multiple policies might apply to a single sign-in. By carefully designing and managing your Conditional Access policies, you can create a powerful and flexible security framework that protects your organization's resources.
Privileged Identity Management (PIM)
Administrative accounts, with their elevated permissions, are a prime target for attackers. If a global administrator account is compromised, the attacker can gain complete control over the Azure environment. To mitigate this risk, it is essential to protect privileged accounts and strictly control their use. This is where Azure AD Privileged Identity Management (PIM) comes into play. PIM is a service in Azure AD Premium P2 that enables you to manage, control, and monitor access to important resources in your organization. A Microsoft Certified: Azure Security Engineer Associate must know how to use PIM to implement the principles of least privilege and just-in-time (JIT) access.
The core concept of PIM is to move away from having users as permanent administrators. Instead, users are made eligible for administrative roles. When they need to perform a privileged task, they must go through an activation process to gain the necessary permissions. This activation process can be configured to require justification, MFA, or approval from another user. The access is granted only for a limited time, after which it is automatically revoked. This just-in-time approach significantly reduces the exposure of privileged accounts and minimizes the risk of their misuse.
PIM allows you to manage access to both Azure AD roles (like Global Administrator) and Azure resource roles (like Owner or Contributor on a subscription). You can discover and manage all privileged roles in your environment from a central dashboard. PIM also provides detailed auditing and alerting capabilities. You can see who activated a role, when they activated it, and what they did while the role was active. You can also configure alerts for suspicious or unsafe privileged access activities, such as too many global administrator activations in a short period.
Another key feature of PIM is access reviews. You can create access reviews for privileged roles to ensure that the eligibility for these roles is still required. The review can be assigned to the users themselves or to a designated reviewer. If a user's eligibility is no longer needed, it can be removed as part of the review process. This helps to prevent "privilege creep," where users accumulate unnecessary permissions over time. By implementing PIM, you can establish a robust governance framework for privileged access, ensuring that it is controlled, monitored, and used appropriately.
Understanding Role-Based Access Control (RBAC)
While PIM is focused on governing access to privileged roles, Role-Based Access Control (RBAC) is the mechanism for granting granular permissions to all resources in Azure. It is the primary tool for enforcing the principle of least privilege across the entire Azure platform. A Microsoft Certified: Azure Security Engineer Associate must have a deep understanding of how Azure RBAC works and how to use it effectively to control access. RBAC is not about restricting users; it is about enabling them to do their jobs while ensuring they only have the permissions they absolutely need.
An Azure RBAC role assignment consists of three components. The first is the security principal, which is the user, group, service principal, or managed identity that is being granted access. It is a best practice to assign roles to groups rather than individual users, as this simplifies management. The second component is the role definition, which is a collection of permissions. Azure provides a large number of built-in roles, such as Owner, Contributor, Reader, and many more specific roles like Virtual Machine Contributor. You can also create custom roles if the built-in roles do not meet your specific needs.
The third component is the scope. The scope is the level in the Azure resource hierarchy at which the access is granted. You can assign roles at four different levels: management group, subscription, resource group, or individual resource. Permissions are inherited down the hierarchy. For example, if you assign the Contributor role to a group at the subscription scope, all members of that group will have Contributor permissions on all resource groups and resources within that subscription. It is important to assign roles at the narrowest scope possible to limit the potential impact of a compromised account.
Managing RBAC effectively requires a clear strategy. You should define a role-based access model for your organization that maps job functions to Azure roles. You should also regularly review role assignments to ensure they are still appropriate. The access reviews feature in Azure AD can be used to manage reviews for group memberships, and therefore for the RBAC roles assigned to those groups. By implementing a well-defined RBAC strategy, you can ensure that access to your Azure resources is tightly controlled, audited, and aligned with your organization's security and governance requirements.
Azure AD Identity Protection
Azure AD Identity Protection is a powerful tool that leverages Microsoft's vast threat intelligence network to detect and protect against identity-based risks. It uses machine learning algorithms and heuristics to identify suspicious activities related to user accounts and sign-ins. For a Microsoft Certified: Azure Security Engineer Associate, Identity Protection is a key component of a proactive security strategy. It allows you to move from a reactive posture, where you respond to incidents after they occur, to a proactive one, where you can automate the detection and remediation of identity risks.
Identity Protection calculates two main types of risk: user risk and sign-in risk. User risk is a measure of the probability that a user account has been compromised. It is calculated based on factors like leaked credentials found on the dark web or sign-ins from anonymous IP addresses. Sign-in risk is a measure of the probability that a specific sign-in attempt is not authorized by the user. It is calculated in real-time based on signals like an impossible travel scenario or a sign-in from an infected device.
Identity Protection provides a dashboard where you can view and investigate these detected risks. You can see a list of risky users and risky sign-ins, along with detailed information about the risk events. This information can help you understand the nature of the threat and take appropriate action. However, the true power of Identity Protection lies in its ability to automate the response to these risks through risk-based policies. You can configure user risk policies and sign-in risk policies that are triggered when the risk level reaches a certain threshold.
These risk-based policies are configured within the Conditional Access framework. For example, you can create a sign-in risk policy that requires MFA if the sign-in risk is medium or high. For high-risk sign-ins, you might choose to block access entirely. Similarly, you can create a user risk policy that requires the user to perform a secure password reset if their account is deemed to be at risk. By automating the response to identity risks, you can significantly improve your security posture and reduce the time it takes to mitigate threats, freeing up your security team to focus on more strategic initiatives.
Building a Secure Network Foundation in Azure
After establishing a robust identity and access management framework, the next critical layer of defense is securing the platform itself. This involves protecting the underlying infrastructure that hosts your applications and data. For a Microsoft Certified: Azure Security Engineer Associate, implementing platform protection is a core responsibility that focuses heavily on network security. The network is the primary conduit for traffic to and from your Azure resources, and securing it is essential to prevent unauthorized access and attacks. A well-designed and secure network architecture is the bedrock of a secure Azure environment.
The journey to platform protection begins with the Azure Virtual Network (VNet). A VNet is a logical isolation of the Azure cloud dedicated to your subscription. It is your private network space in Azure. A security engineer must be proficient in designing VNet architectures that support the organization's security and connectivity requirements. This includes careful planning of the VNet address space to avoid overlaps with on-premises networks and to allow for future growth. A key design principle is network segmentation, which involves dividing the VNet into multiple subnets to isolate resources and control traffic flow between them.
Securing the perimeter of your VNet is a critical first step. This involves protecting your resources from external threats originating from the internet. Azure provides several services to help you build a secure network perimeter, including Azure DDoS Protection, which defends against volumetric network attacks, and Azure Firewall, a managed next-generation firewall service. However, platform protection goes beyond just the perimeter. It also involves securing the traffic within your VNet, a practice often referred to as micro-segmentation. This is where tools like Network Security Groups (NSGs) play a crucial role.
This part of our series will delve into the various technologies and strategies for implementing comprehensive platform protection in Azure. We will explore how to design secure network architectures, implement layered security controls, and protect your compute and container workloads. Mastering these skills is essential for any Microsoft Certified: Azure Security Engineer Associate, as they are fundamental to building a resilient and defensible cloud infrastructure. We will cover everything from basic network filtering to advanced threat protection, providing you with the knowledge needed to safeguard your organization's Azure platform.
Designing Secure Virtual Networks
The design of your virtual network architecture has a profound impact on your overall security posture. A poorly designed network can be difficult to secure and manage, while a well-architected network provides a strong foundation for implementing effective security controls. A Microsoft Certified: Azure Security Engineer Associate must be able to design VNet architectures that are secure, scalable, and manageable. This involves making key decisions about network topology, address spacing, and segmentation. One of the most common and recommended network topologies is the hub-and-spoke model.
In a hub-and-spoke architecture, a central hub VNet is used to manage external connectivity and host shared services, such as Azure Firewall, VPN gateways, and domain controllers. Multiple spoke VNets are then peered with the hub VNet. These spoke VNets are used to host individual workloads or applications. This model provides several benefits. It allows for centralized management of security and connectivity, which simplifies administration and ensures consistent application of policies. It also provides natural isolation between workloads, as traffic between spokes must transit through the hub, where it can be inspected and filtered.
Proper address space planning is another critical aspect of secure VNet design. You need to allocate a large enough IP address range to your VNet to accommodate your current and future needs. You also need to ensure that the address space does not overlap with any of your on-premises networks or other peered VNets. Overlapping address spaces can cause significant connectivity and routing issues. When dividing your VNet into subnets, you should follow the principle of least privilege, creating smaller subnets for specific application tiers or roles. This allows you to apply more granular security controls.
Subnet delegation is a feature that allows you to designate a specific subnet for an Azure PaaS service that needs to be injected into your VNet, such as Azure SQL Managed Instance or Azure App Service Environment. This provides better integration and security for these services. As a security engineer, you need to understand how to use subnet delegation effectively. By applying these design principles, you can create a VNet architecture that is not only secure but also provides a flexible and scalable foundation for your cloud deployments, forming a critical component of your platform protection strategy.
Mastering Network Security Groups (NSGs)
Network Security Groups (NSGs) are a fundamental tool for controlling network traffic in Azure. They act as a distributed, stateful firewall at the network layer, allowing you to filter inbound and outbound traffic to and from Azure resources. A deep understanding of NSGs is an essential skill for any Microsoft Certified: Azure Security Engineer Associate. You will use NSGs extensively to implement micro-segmentation and enforce network access policies. Mastering the creation, application, and management of NSG rules is critical for securing your VNet environment.
An NSG is a collection of security rules. Each rule specifies a source, a destination, a protocol, a direction (inbound or outbound), a port range, and an action (allow or deny). Rules are processed in order of priority, with lower numbers having higher priority. It is important to understand that NSGs are stateful. If you create an outbound rule that allows traffic to a specific destination, the return traffic is automatically allowed, regardless of any inbound rules. NSGs can be associated with either a subnet or a network interface card (NIC), or both.
When an NSG is associated with a subnet, its rules apply to all resources within that subnet. When it is associated with a NIC, its rules apply only to that specific NIC. If a resource has NSGs at both the subnet and NIC levels, the rules are evaluated together. For inbound traffic, the rules at the subnet level are processed first, followed by the rules at the NIC level. For outbound traffic, the order is reversed. This allows you to create a layered security model, with broader rules at the subnet level and more specific rules at the NIC level.
A best practice when working with NSGs is to use Application Security Groups (ASGs). An ASG is a logical grouping of virtual machines. You can use an ASG as the source or destination in an NSG rule, instead of using explicit IP addresses. This makes the rules much easier to create and manage, especially in dynamic environments where VMs are frequently created and deleted. For example, you can create an ASG for your web servers and another for your database servers, and then create NSG rules that allow traffic from the web server ASG to the database server ASG on the required port.
Deploying and Configuring Azure Firewall
While NSGs are excellent for basic network filtering, some scenarios require more advanced protection. This is where Azure Firewall comes in. Azure Firewall is a managed, cloud-native firewall-as-a-service that provides centralized network protection for all your VNets. A Microsoft Certified: Azure Security Engineer Associate should know when to use Azure Firewall and how to deploy and configure it to enhance platform protection. It offers capabilities that go beyond what NSGs can provide, making it a key component of a defense-in-depth security strategy.
Azure Firewall is a stateful firewall that supports application-level and network-level filtering rules. It also includes built-in threat intelligence from the Microsoft Cyber Security team. This threat intelligence feed is continuously updated to protect against known malicious IP addresses and domains. You can configure Azure Firewall to alert on or deny traffic to and from these malicious locations. This provides a powerful, proactive layer of protection for your environment. Azure Firewall is a fully managed service, which means you don't have to worry about deploying, patching, or scaling the underlying infrastructure.
A common deployment pattern for Azure Firewall is in the hub VNet of a hub-and-spoke topology. All traffic between the spoke VNets and to and from the internet is routed through the firewall in the hub. This allows you to centrally manage and inspect all traffic from a single point. You can create a collection of rules in Azure Firewall to control this traffic. There are three types of rule collections: NAT rules, network rules, and application rules. NAT rules are used to translate and filter inbound internet traffic. Network rules are used for layer 4 filtering, while application rules are used for layer 7 filtering, including by FQDN.
Azure Firewall Premium offers even more advanced capabilities, such as TLS inspection, intrusion detection and prevention (IDPS), and URL filtering. TLS inspection allows the firewall to decrypt and inspect encrypted traffic to detect threats that would otherwise be hidden. The IDPS feature can monitor network traffic for malicious activity and block it in real time. As a security engineer, you need to understand the different SKUs of Azure Firewall and their features to choose the right solution for your organization's needs. Properly configuring and managing Azure Firewall is a key skill for securing your Azure network infrastructure.
Securing Azure Virtual Machines
Virtual machines (VMs) are a fundamental compute resource in Azure, and securing them is a critical aspect of platform protection. A compromised VM can be used as a foothold for an attacker to move laterally within your network and access other resources. A Microsoft Certified: Azure Security Engineer Associate must be proficient in implementing a variety of security controls to harden VMs and protect them from threats. This involves a layered approach that addresses security at the operating system level, the network level, and the management level.
One of the first steps in securing a VM is to ensure that the operating system is properly hardened. This includes applying the latest security patches, disabling unnecessary services, and configuring the OS to follow security best practices. Azure Update Management is a service that helps you manage OS updates for both Windows and Linux VMs across your environment. You should also implement endpoint protection on your VMs to defend against malware. Microsoft Defender for Endpoint, which is integrated with Microsoft Defender for Cloud, provides comprehensive endpoint detection and response (EDR) capabilities.
Controlling access to VMs is another crucial security measure. You should restrict network access to the VM's management ports (such as RDP for Windows and SSH for Linux) using NSGs. A best practice is to use a jump box or bastion host to access your VMs, rather than exposing their management ports directly to the internet. Azure Bastion is a managed PaaS service that provides secure and seamless RDP and SSH access to your VMs directly from the Azure portal over SSL, without requiring a public IP address on the VM. Just-in-time (JIT) VM access, a feature of Microsoft Defender for Cloud, can further lock down management ports by opening them only on demand for a limited time.
Encrypting the disks of your VMs is essential for protecting data at rest. Azure Disk Encryption allows you to encrypt the OS and data disks of your VMs using BitLocker for Windows and DM-Crypt for Linux. The encryption keys are stored and managed in an Azure Key Vault, giving you control over them. You should also monitor your VMs for security misconfigurations and threats. Microsoft Defender for Cloud continuously assesses your VMs against security benchmarks and provides recommendations for improving their security posture. It also provides threat detection alerts for suspicious activities on your VMs.
Microsoft Certified: Azure Security Engineer Associate certification practice test questions and answers, training course, study guide are uploaded in ETE files format by real users. Study and pass Microsoft Microsoft Certified: Azure Security Engineer Associate certification exam dumps & practice test questions and answers are the best available resource to help students pass at the first attempt.


