- Home
- Microsoft Certifications
- AZ-500 Microsoft Azure Security Technologies Dumps
Pass Microsoft Azure Security AZ-500 Exam in First Attempt Guaranteed!
Get 100% Latest Exam Questions, Accurate & Verified Answers to Pass the Actual Exam!
30 Days Free Updates, Instant Download!


AZ-500 Premium Bundle
- Premium File 515 Questions & Answers. Last update: Jul 03, 2026
- Training Course 73 Video Lectures
- Study Guide 635 Pages


Last Week Results!

Includes question types found on the actual exam such as drag and drop, simulation, type-in and fill-in-the-blank.

Based on real-life scenarios similar to those encountered in the exam, allowing you to learn by working with real equipment.

Developed by IT experts who have passed the exam in the past. Covers in-depth knowledge required for exam preparation.
All Microsoft Azure Security AZ-500 certification exam dumps, study guide, training courses are Prepared by industry experts. PrepAway's ETE files povide the AZ-500 Microsoft Azure Security Technologies practice test questions and answers & exam dumps, study guide and training courses help you study and pass hassle-free!
Mastering Azure Security: Preparation Guide for the AZ-500 Exam
The AZ-500 exam, officially titled Microsoft Azure Security Technologies, is a certification designed for security engineers who implement security controls, maintain an organization's security posture, identify and remediate vulnerabilities, and respond to security incidents in Azure environments. It is one of the most respected and practically relevant security certifications in the Microsoft ecosystem, validating skills that are directly applicable to the daily responsibilities of cloud security professionals. Passing this exam earns the Microsoft Certified: Azure Security Engineer Associate credential, which is recognized across industries where Azure adoption is significant.
This exam is not a starting point for security professionals new to Azure. It assumes that candidates have a working knowledge of Azure fundamentals, including core services, identity management, and basic networking concepts. Ideally, candidates should also have practical experience implementing security solutions in Azure environments before sitting for the exam. The questions are scenario-based and require you to apply your knowledge to realistic security situations, which means surface-level familiarity with Azure services is not sufficient. You need to know how to configure, monitor, and troubleshoot security controls in environments that resemble actual enterprise deployments.
Identity Protection and Management
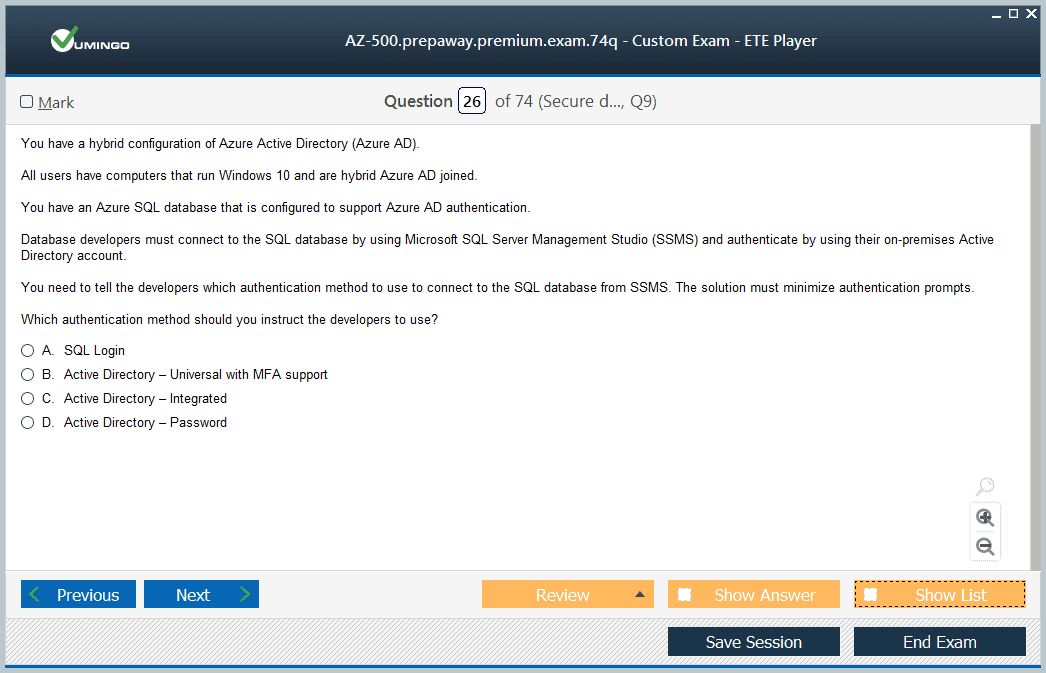
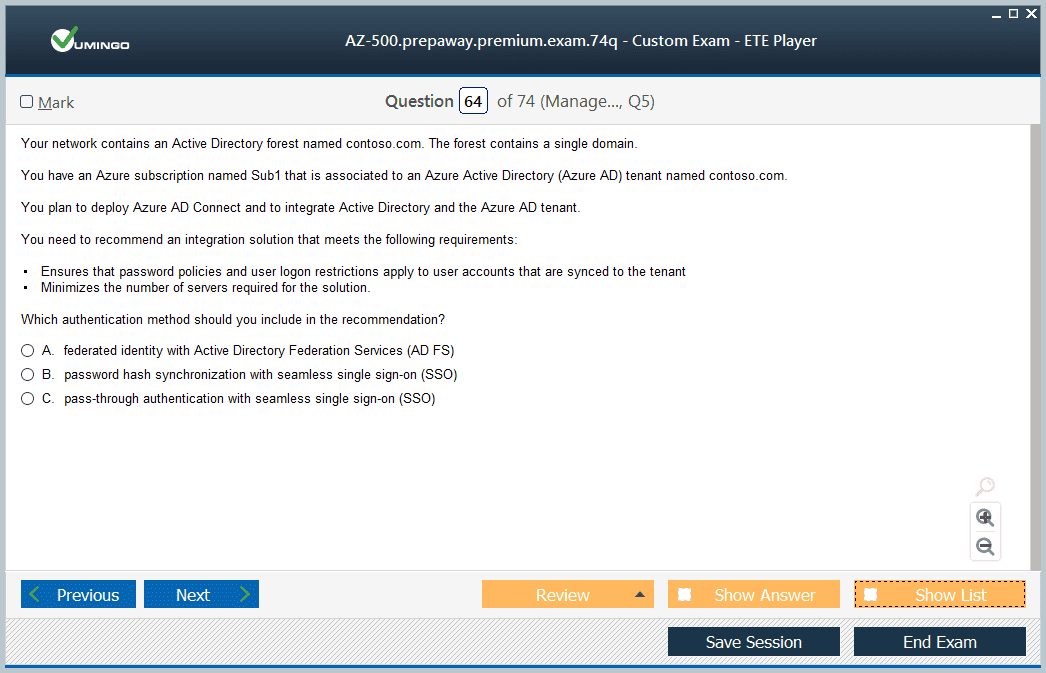
Identity is the primary security perimeter in cloud environments, and the AZ-500 exam places significant weight on identity protection and management topics. Candidates must know how to configure and manage Azure Active Directory, implement multi-factor authentication, set up conditional access policies, and work with Azure AD Identity Protection. Conditional access is particularly important because it allows organizations to enforce access controls based on signals such as user location, device compliance status, sign-in risk level, and application sensitivity. Knowing how to design conditional access policies that balance security requirements with user productivity is a skill the exam tests thoroughly.
Azure AD Privileged Identity Management, commonly referred to as PIM, is another critical topic in this domain. PIM allows organizations to implement just-in-time privileged access, requiring users to activate elevated roles only when needed rather than holding permanent administrative permissions. This significantly reduces the risk of compromised accounts being used to cause widespread damage. Candidates should know how to configure PIM for Azure AD roles and Azure resource roles, set up access reviews, and interpret PIM audit logs. The principle of least privilege is a theme that runs throughout the identity section of the exam, and every configuration decision should be evaluated through that lens.
Platform Protection Techniques
Protecting the Azure platform itself involves securing the infrastructure layer on which workloads run. The AZ-500 exam covers platform protection extensively, including network security, host security, and container security. On the network side, candidates must know how to configure Azure Firewall, Network Security Groups, Application Security Groups, and Azure DDoS Protection. Azure Firewall is a managed, cloud-native firewall service that provides stateful packet inspection, threat intelligence-based filtering, and centralized policy management. Network Security Groups operate at a more granular level, controlling inbound and outbound traffic at the subnet and network interface level.
Host security covers the protection of virtual machines and other compute resources running in Azure. Candidates should know how to implement Microsoft Defender for Servers, configure Just-In-Time VM access to reduce the attack surface of virtual machines exposed to network access, and use Azure Bastion to provide secure remote access without exposing RDP or SSH ports to the public internet. Container security is an increasingly important area as organizations adopt containerized workloads. The exam covers how to secure Azure Kubernetes Service clusters, implement Azure Container Registry security features, and use Microsoft Defender for Containers to detect threats in containerized environments.
Data and Application Security
Securing data and applications is a domain where the AZ-500 exam tests both breadth and depth. On the data side, candidates must know how to implement encryption for data at rest and data in transit, configure Azure Key Vault for storing and managing secrets, keys, and certificates, and apply role-based access control to storage accounts and databases. Azure Key Vault is one of the most important services in the AZ-500 exam because it underpins the security of almost every other Azure service. You should know how to create and manage Key Vault instances, configure access policies and RBAC permissions, enable soft delete and purge protection, and integrate Key Vault with other services through managed identities.
Application security covers how to protect web applications and APIs deployed in Azure. Azure Web Application Firewall, which can be deployed in front of applications through Azure Application Gateway or Azure Front Door, protects against common web exploits such as SQL injection and cross-site scripting. Candidates should know how to configure WAF policies, customize rules, and interpret WAF logs to identify and respond to attack attempts. Azure API Management provides security features for APIs including authentication, rate limiting, and threat protection. The exam also covers how to implement managed identities for Azure resources, which eliminate the need to store credentials in application code by providing automatically managed identities that can authenticate to any service supporting Azure AD authentication.
Security Operations and Monitoring
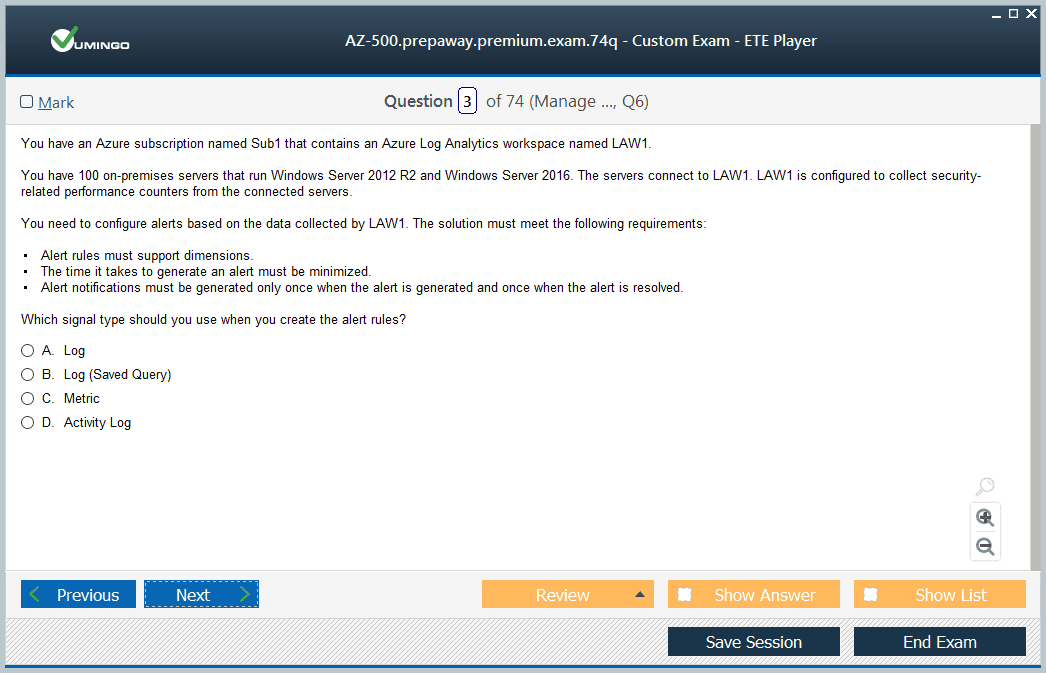
Security operations is the practice of continuously monitoring an environment, detecting threats, and responding to incidents. The AZ-500 exam covers this domain through Azure Monitor, Microsoft Sentinel, and Microsoft Defender for Cloud. Azure Monitor provides the foundation for collecting and analyzing telemetry data from Azure resources, including metrics, activity logs, and resource logs. Candidates should know how to configure diagnostic settings to route logs to a Log Analytics workspace, create alert rules based on log query results or metric thresholds, and use Azure Monitor Workbooks to visualize security data.
Microsoft Sentinel is Azure's cloud-native Security Information and Event Management platform, and it receives significant attention in the AZ-500 exam. Sentinel collects data from across an organization's entire digital estate, applies analytics to detect threats, investigates incidents, and enables automated response through playbooks built on Azure Logic Apps. Candidates should know how to connect data sources to Sentinel, configure analytics rules, work with incidents and alerts, and build basic automation playbooks. Microsoft Defender for Cloud, formerly known as Azure Security Center, provides continuous security posture assessment, threat protection recommendations, and regulatory compliance tracking. You should be familiar with its Secure Score feature and know how to interpret and act on its security recommendations.
Azure Key Vault Deep Dive
Azure Key Vault deserves dedicated attention in any AZ-500 preparation plan because of how frequently it appears in exam questions and how central it is to real-world Azure security architectures. Key Vault supports three types of objects: secrets, which store sensitive string values such as passwords and connection strings; keys, which are cryptographic keys used for encryption operations; and certificates, which are X.509 certificates used for TLS and other authentication scenarios. Each object type has its own management interface, access control model, and set of supported operations.
Key Vault comes in two tiers: standard and premium. The premium tier adds support for hardware security module-backed keys, which provide an additional layer of protection for cryptographic operations by ensuring that key material never leaves the HSM in plaintext form. For the exam, you should understand the difference between software-protected and HSM-protected keys and know when each is appropriate. You should also know how to configure Key Vault networking, including the use of private endpoints and firewall rules to restrict access to Key Vault to specific virtual networks or IP address ranges. Key Vault access control can be managed through either legacy access policies or Azure RBAC, and the exam may test your knowledge of both models and the scenarios where each is preferred.
Microsoft Defender for Cloud
Microsoft Defender for Cloud is a unified security management system that strengthens the security posture of cloud workloads and provides advanced threat protection across Azure, hybrid, and multi-cloud environments. The AZ-500 exam tests your ability to configure and use Defender for Cloud effectively, including how to enable it for an Azure subscription, interpret its security recommendations, and implement the Secure Score improvements it suggests. The Secure Score is a numerical representation of your security posture that increases as you implement more of Defender for Cloud's recommendations.
Defender for Cloud's enhanced security features, previously sold as Azure Defender, provide workload-specific threat protection for services including virtual machines, SQL databases, storage accounts, Key Vault, Kubernetes clusters, and container registries. Candidates should know which threats each workload protection plan detects and what alerts it generates. Regulatory compliance is another feature of Defender for Cloud that appears in the exam, allowing organizations to track their compliance status against standards such as the Azure Security Benchmark, PCI DSS, ISO 27001, and SOC 2. Knowing how to interpret compliance reports and remediate compliance gaps is a skill the exam validates.
Securing Azure Storage Resources
Storage security is a dedicated topic in the AZ-500 exam that covers how to protect data stored in Azure Storage accounts, Azure SQL Database, Azure Cosmos DB, and other data services. For Azure Storage, candidates must know how to configure access control using shared access signatures, storage account keys, and Azure RBAC. Shared access signatures provide time-limited, permission-scoped access tokens that allow external parties to access specific storage resources without sharing the storage account key. You should know the difference between service SAS, account SAS, and user delegation SAS, and understand when each type is appropriate.
Azure Defender for Storage provides threat detection for storage accounts, alerting on suspicious access patterns such as access from unusual locations, potential malware uploads, and anomalous data exfiltration activity. Soft delete and versioning features protect against accidental or malicious deletion of blob data by retaining deleted content for a configurable retention period. For Azure SQL Database, the exam covers how to implement Always Encrypted to protect sensitive column data, configure Transparent Data Encryption for at-rest encryption, enable SQL auditing to track database activity, and use Advanced Threat Protection to detect unusual database access patterns. Comprehensive storage security requires layering multiple controls, and the exam tests your ability to design and implement that layered approach.
Network Security Implementation
Network security in Azure involves multiple layers of controls that work together to restrict access, detect threats, and isolate workloads. The AZ-500 exam covers network security in considerable depth, starting with virtual network design and extending to advanced features like Azure Private Link and service endpoints. Private Link allows you to access Azure services over a private endpoint within your virtual network, eliminating exposure to the public internet and reducing the risk of data exfiltration. Service endpoints provide a simpler alternative that extends the virtual network identity to Azure services without creating a private IP address for the service within the VNet.
Azure Firewall Premium, which is an upgraded version of the standard Azure Firewall, provides additional security features including TLS inspection, which decrypts and inspects encrypted traffic for threats, and IDPS, which is an intrusion detection and prevention system that monitors network traffic for known attack patterns. The exam may test your knowledge of when to use Azure Firewall versus Network Security Groups and how to combine them in a hub-and-spoke network topology where security controls are centralized. User-defined routes allow administrators to override Azure's default routing behavior and force traffic through security appliances such as Azure Firewall before it reaches its destination.
Governance and Compliance Frameworks
Security governance involves establishing and enforcing policies that ensure resources are configured securely and consistently across an organization's Azure environment. Azure Policy is the primary tool for governance in Azure, and the AZ-500 exam covers it in the context of security enforcement. Candidates should know how to create and assign policy definitions, build initiative definitions that group related policies, interpret compliance reports, and use remediation tasks to bring non-compliant resources into compliance automatically.
Azure Blueprints, which provide a way to package policies, role assignments, and resource templates into a single deployable unit, may also appear in exam questions related to governance at scale. Management groups allow organizations to organize subscriptions into a hierarchy and apply governance controls at the group level, ensuring that security policies propagate to all subscriptions within the group automatically. For regulated industries, the ability to demonstrate compliance with specific frameworks is essential. The exam tests your knowledge of how to use Defender for Cloud's regulatory compliance dashboard and how to map Azure security controls to compliance requirements. Governance is not a one-time activity but an ongoing process that requires continuous monitoring and adjustment.
Incident Response in Azure
Incident response is the process of detecting, investigating, and recovering from security incidents, and the AZ-500 exam covers how Azure tools support each phase of this process. Detection relies on the monitoring and alerting capabilities covered earlier, including Microsoft Sentinel analytics rules, Defender for Cloud alerts, and Azure Monitor alert rules. When an alert fires, the investigation phase begins, which involves gathering context about the incident, identifying affected resources, and determining the scope and nature of the attack.
Microsoft Sentinel provides several tools that support investigation, including the incident page which aggregates related alerts into a single case, the investigation graph which visualizes relationships between entities involved in an incident, and the entity pages which provide detailed information about users, devices, and IP addresses that appear in incident data. Response actions can be automated using Sentinel playbooks, which are Logic Apps workflows triggered by specific alert or incident conditions. For example, a playbook might automatically disable a compromised user account, block a malicious IP address in Azure Firewall, or send a notification to the security team when a high-severity incident is created. Effective incident response reduces the time between detection and containment, which directly limits the damage a security incident can cause.
Privileged Access Management
Privileged access management is the practice of securing, monitoring, and controlling access to privileged accounts and roles within an organization. In Azure, this is primarily implemented through Azure AD Privileged Identity Management, which the AZ-500 exam covers extensively. PIM provides just-in-time access to privileged roles, requiring users to activate their roles for a limited time period and with a justification before they can exercise elevated permissions. This approach ensures that privileged access is used only when needed and that every activation is logged for audit purposes.
Access reviews are another PIM feature that the exam covers. Access reviews allow organizations to periodically verify that users still need the roles and permissions they have been assigned, removing access when it is no longer justified. This is particularly important for guest users and external contractors who may retain access long after their engagement with the organization has ended. The exam also covers the concept of emergency access accounts, sometimes called break-glass accounts, which are highly privileged accounts kept in reserve for use when normal administrative access is unavailable. Candidates should know how to configure and protect emergency access accounts and why they are an important component of a comprehensive privileged access management strategy.
Secure Score and Posture Management
The Secure Score in Microsoft Defender for Cloud is a metric that quantifies an organization's security posture based on the security controls it has implemented. Each control is worth a certain number of points, and your Secure Score increases as you implement more controls. The AZ-500 exam tests your ability to interpret the Secure Score, understand what it measures, and prioritize remediation efforts to improve it effectively. Not all recommendations have the same impact on the Secure Score, so candidates should know how to identify high-impact recommendations and focus attention on the controls that will deliver the greatest security improvement.
Beyond the Secure Score, Defender for Cloud provides attack path analysis, which identifies sequences of steps an attacker could take to compromise resources in your environment. This feature helps security teams understand the real-world risk posed by individual vulnerabilities and prioritize remediation based on the paths that are most likely to be exploited. Cloud Security Posture Management, or CSPM, is the broader discipline that encompasses Secure Score management, and Defender for Cloud is Microsoft's primary CSPM tool. Candidates should understand how CSPM relates to Cloud Workload Protection, which is the threat detection capability, and know when each is the appropriate focus for a given security objective.
Study Resources and Preparation Tips
Preparing for the AZ-500 exam requires a combination of structured learning and hands-on practice in a real Azure environment. Microsoft Learn provides free, official learning paths aligned to the AZ-500 exam objectives, and these should form the backbone of any preparation plan. Each module in the learning paths includes explanations, knowledge checks, and sandbox exercises that allow you to practice configurations without needing your own Azure subscription. Completing these learning paths ensures that your preparation covers all of the domains included in the official exam outline.
Supplementing Microsoft Learn with practice exams from reputable providers helps you assess your readiness and identify topics that need additional attention. Practice exams expose you to the style and difficulty of AZ-500 questions and help you develop the time management skills needed to complete the exam within the allotted time. Hands-on practice in a personal Azure subscription or free trial environment is invaluable for topics like Key Vault configuration, Sentinel setup, and conditional access policy design. Reading Microsoft security documentation, following the Microsoft Security Blog, and engaging with the security community through forums and LinkedIn groups all contribute to a deeper and more nuanced understanding of the topics the exam covers.
Exam Day Best Strategies
The AZ-500 exam typically contains between 40 and 60 questions and must be completed within 150 minutes. Question formats include multiple choice, multiple select, drag and drop, and case studies. The passing score is 700 out of 1000. The exam can be taken at a Pearson VUE testing center or online through remote proctoring. Before your exam date, review the official skills measured document on the Microsoft certification website, as the exam is updated periodically to reflect changes in Azure security services and features.
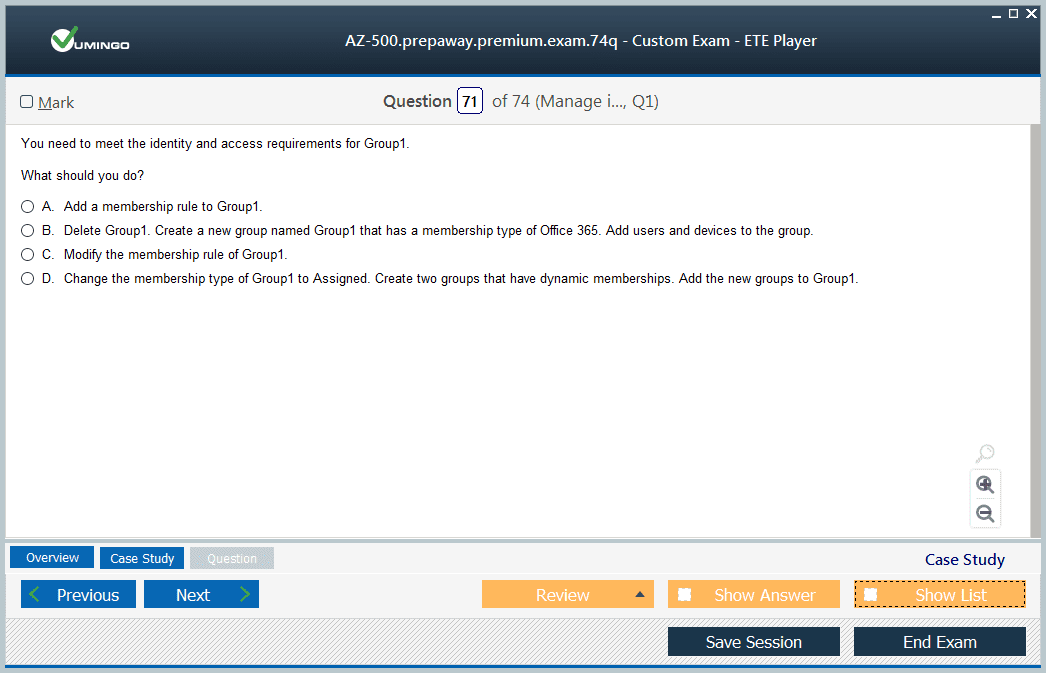
During the exam, pay careful attention to scenario details, particularly the specific security requirements, constraints, and business context provided in each question. Azure security questions often have multiple technically valid answers, and the correct choice depends on identifying which solution best meets all of the stated requirements. Eliminate obviously incorrect options first, then compare the remaining choices against the full set of requirements in the scenario. If you encounter a case study, read the background information carefully before answering the associated questions, as the details provided in the case study context are essential for selecting the correct answers. Flag uncertain questions and revisit them after completing the rest of the exam.
Conclusion
The AZ-500 certification is a rigorous and professionally significant credential that validates the skills needed to protect Azure environments at an enterprise level. Security is one of the most critical and fastest-evolving disciplines in cloud computing, and the professionals who can implement, manage, and continuously improve security controls in Azure environments are in high demand across virtually every industry. Earning this certification demonstrates that you have the technical depth to handle the full spectrum of Azure security responsibilities, from identity management and platform protection to threat detection, incident response, and compliance governance.
The preparation process for the AZ-500 is substantial, but it is designed to build skills that have immediate practical value. Every topic covered in the exam maps to a real security capability that organizations need. Learning how to configure Microsoft Sentinel analytics rules is not just exam preparation. It is the foundation of an effective security operations capability. Knowing how to implement just-in-time VM access and conditional access policies directly reduces the attack surface of production environments. The study process itself makes you a better security engineer, which is perhaps the most compelling argument for pursuing this certification.
What sets the AZ-500 apart from many other certifications is its focus on applied, scenario-based knowledge. The exam does not reward memorization of feature lists. It rewards the ability to reason about security problems and select appropriate solutions given specific constraints and requirements. Developing this reasoning ability requires genuine engagement with the material, not passive reading. Building lab environments, troubleshooting configurations, and experimenting with Azure security services in a hands-on environment builds the kind of intuitive knowledge that scenario-based exams test. Candidates who practice actively consistently outperform those who rely solely on reading and video content.
The career benefits of the AZ-500 are concrete and measurable. Security engineering roles that require Azure expertise command strong compensation, and the certified professional has a demonstrable advantage in the hiring process. Beyond initial employment, the certification opens doors to senior security architect positions, cloud security consulting roles, and leadership opportunities in security operations. Organizations that have invested heavily in Azure need security professionals who can protect those investments, and they are willing to compensate those professionals accordingly. The AZ-500 positions you as exactly the kind of expert those organizations are looking for, making it one of the highest-return certifications available to Azure security professionals today.
Microsoft Azure Security AZ-500 practice test questions and answers, training course, study guide are uploaded in ETE Files format by real users. Study and Pass AZ-500 Microsoft Azure Security Technologies certification exam dumps & practice test questions and answers are to help students.
Exam Comments * The most recent comment are on top
- AZ-104 - Microsoft Azure Administrator
- AZ-305 - Designing Microsoft Azure Infrastructure Solutions
- DP-700 - Implementing Data Engineering Solutions Using Microsoft Fabric
- AB-100 - Agentic AI Business Solutions Architect
- SC-300 - Microsoft Identity and Access Administrator
- MD-102 - Endpoint Administrator
- AB-900 - Microsoft 365 Copilot and Agent Administration Fundamentals
- PL-300 - Microsoft Power BI Data Analyst
- MS-102 - Microsoft 365 Administrator
- AI-900 - Microsoft Azure AI Fundamentals
- SC-200 - Microsoft Security Operations Analyst
- SC-401 - Administering Information Security in Microsoft 365
- AZ-900 - Microsoft Azure Fundamentals
- AZ-700 - Designing and Implementing Microsoft Azure Networking Solutions
- DP-600 - Implementing Analytics Solutions Using Microsoft Fabric
- AI-102 - Designing and Implementing a Microsoft Azure AI Solution
- AZ-500 - Microsoft Azure Security Technologies
- SC-100 - Microsoft Cybersecurity Architect
- AB-730 - AI Business Professional
- AB-731 - AI Transformation Leader
- AI-103 - Developing AI Apps and Agents on Azure
- GH-300 - GitHub Copilot
- PL-400 - Microsoft Power Platform Developer
- AZ-204 - Developing Solutions for Microsoft Azure
- SC-900 - Microsoft Security, Compliance, and Identity Fundamentals
- AZ-140 - Configuring and Operating Microsoft Azure Virtual Desktop
- AZ-400 - Designing and Implementing Microsoft DevOps Solutions
- DP-300 - Administering Microsoft Azure SQL Solutions
- MS-700 - Managing Microsoft Teams
- AZ-801 - Configuring Windows Server Hybrid Advanced Services
- PL-600 - Microsoft Power Platform Solution Architect
- AZ-800 - Administering Windows Server Hybrid Core Infrastructure
- PL-200 - Microsoft Power Platform Functional Consultant
- MB-800 - Microsoft Dynamics 365 Business Central Functional Consultant
- AI-300 - Operationalizing Machine Learning and Generative AI Solutions
- PL-900 - Microsoft Power Platform Fundamentals
- MB-310 - Microsoft Dynamics 365 Finance Functional Consultant
- MB-330 - Microsoft Dynamics 365 Supply Chain Management
- DP-900 - Microsoft Azure Data Fundamentals
- MB-820 - Microsoft Dynamics 365 Business Central Developer
- SC-500 - Implementing End-to-End Security Controls for Cloud and AI Workloads
- AI-901 - Microsoft Azure AI Fundamentals
- MB-280 - Microsoft Dynamics 365 Customer Experience Analyst
- MB-230 - Microsoft Dynamics 365 Customer Service Functional Consultant
- MS-721 - Collaboration Communications Systems Engineer
- DP-800 - Developing AI-Enabled Database Solutions
- GH-200 - GitHub Actions
- MB-700 - Microsoft Dynamics 365: Finance and Operations Apps Solution Architect
- DP-100 - Designing and Implementing a Data Science Solution on Azure
- DP-420 - Designing and Implementing Cloud-Native Applications Using Microsoft Azure Cosmos DB
- MB-500 - Microsoft Dynamics 365: Finance and Operations Apps Developer
- GH-900 - GitHub Foundations
- PL-500 - Microsoft Power Automate RPA Developer
- MB-335 - Microsoft Dynamics 365 Supply Chain Management Functional Consultant Expert
- DP-750 - Implementing Data Engineering Solutions Using Azure Databricks
- GH-500 - GitHub Advanced Security
- GH-100 - GitHub Administration
- MS-900 - Microsoft 365 Fundamentals
- AZ-120 - Planning and Administering Microsoft Azure for SAP Workloads
- SC-400 - Microsoft Information Protection Administrator
- MB-240 - Microsoft Dynamics 365 for Field Service
- DP-203 - Data Engineering on Microsoft Azure
- 62-193 - Technology Literacy for Educators
- MO-200 - Microsoft Excel (Excel and Excel 2019)
- MO-400 - Microsoft Outlook (Outlook and Outlook 2019)
- MS-203 - Microsoft 365 Messaging
- MB-910 - Microsoft Dynamics 365 Fundamentals Customer Engagement Apps (CRM)
- 98-367 - Security Fundamentals
- 98-383 - Introduction to Programming Using HTML and CSS
Purchase AZ-500 Exam Training Products Individually
Why customers love us?
What do our customers say?
The resources provided for the Microsoft certification exam were exceptional. The exam dumps and video courses offered clear and concise explanations of each topic. I felt thoroughly prepared for the AZ-500 test and passed with ease.
Studying for the Microsoft certification exam was a breeze with the comprehensive materials from this site. The detailed study guides and accurate exam dumps helped me understand every concept. I aced the AZ-500 exam on my first try!
I was impressed with the quality of the AZ-500 preparation materials for the Microsoft certification exam. The video courses were engaging, and the study guides covered all the essential topics. These resources made a significant difference in my study routine and overall performance. I went into the exam feeling confident and well-prepared.
The AZ-500 materials for the Microsoft certification exam were invaluable. They provided detailed, concise explanations for each topic, helping me grasp the entire syllabus. After studying with these resources, I was able to tackle the final test questions confidently and successfully.
Thanks to the comprehensive study guides and video courses, I aced the AZ-500 exam. The exam dumps were spot on and helped me understand the types of questions to expect. The certification exam was much less intimidating thanks to their excellent prep materials. So, I highly recommend their services for anyone preparing for this certification exam.
Achieving my Microsoft certification was a seamless experience. The detailed study guide and practice questions ensured I was fully prepared for AZ-500. The customer support was responsive and helpful throughout my journey. Highly recommend their services for anyone preparing for their certification test.
I couldn't be happier with my certification results! The study materials were comprehensive and easy to understand, making my preparation for the AZ-500 stress-free. Using these resources, I was able to pass my exam on the first attempt. They are a must-have for anyone serious about advancing their career.
The practice exams were incredibly helpful in familiarizing me with the actual test format. I felt confident and well-prepared going into my AZ-500 certification exam. The support and guidance provided were top-notch. I couldn't have obtained my Microsoft certification without these amazing tools!
The materials provided for the AZ-500 were comprehensive and very well-structured. The practice tests were particularly useful in building my confidence and understanding the exam format. After using these materials, I felt well-prepared and was able to solve all the questions on the final test with ease. Passing the certification exam was a huge relief! I feel much more competent in my role. Thank you!
The certification prep was excellent. The content was up-to-date and aligned perfectly with the exam requirements. I appreciated the clear explanations and real-world examples that made complex topics easier to grasp. I passed AZ-500 successfully. It was a game-changer for my career in IT!


Can you please confirm if these questions and simulator are updated as per new Microsoft new updates of June 2, 2021? Please let me know as I need to write the exam soon.
Thank you