Pass Juniper JNCIA-Junos Certification Exams in First Attempt Guaranteed!
Get 100% Latest Exam Questions, Accurate & Verified Answers to Pass the Actual Exam!
30 Days Free Updates, Instant Download!

JNCIA-Junos Premium Bundle
- JN0-103 Exam
- JN0-105 Exam
- JN0-106 Exam 1 product
JN0-103 Premium Bundle
- Premium File 96 Questions & Answers
Last update: Jul 03, 2026 - Training Course 67 Video Lectures
Purchase Individually

Premium File
Training Course
JN0-105 Premium Bundle
- Premium File 110 Questions & Answers
Last update: Jul 03, 2026 - Training Course 35 Video Lectures
Purchase Individually
Premium File
Training Course
JN0-106 Premium Bundle
Purchase Individually
Premium File

JN0-103 Exam - Junos, Associate (JNCIA-Junos)
JN0-103 Premium Bundle
- Premium File 96 Questions & Answers. Last update: Jul 03, 2026
- Training Course 67 Video Lectures
| Download Free JN0-103 Exam Questions |
|---|
JN0-105 Exam - Junos, Associate (JNCIA-Junos)
JN0-105 Premium Bundle
- Premium File 110 Questions & Answers. Last update: Jul 03, 2026
- Training Course 35 Video Lectures
| Download Free JN0-105 Exam Questions |
|---|
JN0-106 Exam - Junos, Associate (JNCIA-Junos)
JN0-106 Premium ETE File
- Premium File 65 Questions & Answers
Whats Included:
- Latest Questions
- 100% Accurate Answers
- Fast Exam Updates
| Download Free JN0-106 Exam Questions |
|---|
Juniper JNCIA-Junos Certification Practice Test Questions and Answers, Juniper JNCIA-Junos Certification Exam Dumps
All Juniper JNCIA-Junos certification exam dumps, study guide, training courses are prepared by industry experts. Juniper JNCIA-Junos certification practice test questions and answers, exam dumps, study guide and training courses help candidates to study and pass hassle-free!
The Foundation of Juniper Networking An Introduction to JNCIA-Junos
In the sprawling landscape of information technology, professional certifications serve as crucial waypoints on a career map. They provide a standardized measure of skills, a testament to dedication, and a clear signal to employers that an individual possesses a verified baseline of knowledge. For those drawn to the intricate world of data communication, networking certifications are the bedrock upon which successful careers are built. They validate an understanding of how information travels from one point to another, a fundamental process that underpins our modern digital existence. These credentials can open doors to new opportunities and provide a structured path for continuous professional growth.
Among the key players in the networking industry, Juniper Networks has carved out a reputation for high-performance, reliable, and secure solutions. Its certification program is highly respected and provides a comprehensive framework for mastering its technologies. The journey into this ecosystem begins with a single, foundational step. This entry point is designed to equip aspiring professionals with the core competencies needed to operate in a Juniper environment. It is more than just a test; it is the start of a learning pathway that can lead to expertise in routing, switching, security, and beyond, establishing a solid career in the dynamic field of network engineering.
What is the JNCIA-Junos Certification?
The Juniper Networks Certified Associate - Junos (JNCIA-Junos) certification is the entry-level credential in the Juniper Networks certification program. Its primary purpose is to validate a candidate's understanding of the foundational principles of networking and their basic proficiency with the Junos operating system (OS). This certification is aimed at individuals who are new to Juniper technologies, including network administrators, engineers, support personnel, and students who are just beginning their IT careers. It confirms that the holder has the skills required to perform day-to-day tasks on devices running the Junos OS.
Achieving the JNCIA-Junos certification demonstrates a thorough grasp of several key areas. These include the fundamentals of the Junos OS, the basics of the user interface, and initial configuration principles. It also covers operational monitoring and maintenance procedures, fundamental routing concepts, and the basics of routing policy and firewall filters. Essentially, it certifies that an individual is not just familiar with general networking theory but can apply that theory in a practical, hands-on manner using Juniper's powerful and versatile operating system. It is the essential first credential for anyone serious about working with Juniper hardware and software.
The Architecture and Philosophy of Junos OS
The Junos operating system is the common element that powers nearly all of Juniper's hardware platforms, from the smallest branch office routers to the largest core service provider systems. This unified approach is a cornerstone of Juniper's design philosophy. A key architectural feature of Junos OS is the strict separation between its control plane and its forwarding plane. The control plane is responsible for all routing protocols, device management, and high-level decision-making processes. The forwarding plane, or packet forwarding engine, is responsible for the high-speed transit of data packets through the device based on the instructions from the control plane.
This separation provides remarkable stability and security. An issue affecting the control plane, such as a struggling routing process, will not impact the forwarding plane's ability to continue sending traffic. This modularity is a significant advantage in mission-critical environments. Furthermore, Junos OS was designed from the ground up with a hierarchical configuration structure and a single source code base. This means that an engineer who learns to configure a small Juniper router can apply that same knowledge and command structure to a massive core router, ensuring operational consistency and reducing the learning curve across different platforms.
Core Networking Fundamentals Revisited
While the JNCIA-Junos exam focuses on Juniper-specific knowledge, it is built upon a foundation of universal networking principles. Before diving into the intricacies of the Junos OS, a solid understanding of these fundamentals is essential for success. This includes a firm grasp of the OSI (Open Systems Interconnection) model and the TCP/IP protocol suite, which together provide the conceptual framework for all data communications. Understanding the function of each layer, from the Physical layer up to the Application layer, is critical for diagnosing and resolving network issues effectively and efficiently.
Beyond these models, candidates should be comfortable with IP addressing and subnetting. The ability to calculate subnets, determine network and broadcast addresses, and assign host addresses is a non-negotiable skill for any network professional. Equally important are the fundamentals of Ethernet networking, including concepts like MAC addresses, collision domains, and broadcast domains. A clear understanding of how switches operate at Layer 2 to forward frames and how routers operate at Layer 3 to route packets between different networks is the prerequisite knowledge upon which all other JNCIA-Junos topics are built.
Why Choose a Juniper Educational Path?
Embarking on a certification journey with a specific vendor is a significant commitment of time and resources. Choosing the Juniper path offers several distinct advantages for a networking professional. The primary benefit lies in mastering the Junos OS. Its consistent, logical, and powerful command-line interface is widely praised by engineers for its efficiency. Features like the candidate and active configuration system, commit checks, and easy rollback capabilities make network changes safer and more manageable. Learning these features instills best practices that are valuable regardless of the networking environment one might work in in the future.
Furthermore, Juniper has a strong presence in large-scale environments, particularly in the service provider, data center, and enterprise core networking spaces. Gaining expertise in their technologies opens up career opportunities within these demanding and high-stakes sectors of the industry. The knowledge gained through the JNCIA-Junos certification is not merely theoretical; it is directly applicable to real-world scenarios. It provides a skill set focused on stability, scalability, and performance, which are highly sought-after attributes for any network engineer. This focus on robust engineering principles makes the certification a valuable asset.
Navigating the Juniper Certification Landscape
The JNCIA-Junos certification is the gateway to a wide and varied certification landscape offered by Juniper Networks. The program is structured into multiple tracks, allowing professionals to specialize in areas that align with their career goals. After achieving the associate-level certification, an individual can proceed down several paths. The most common next step for many is the Enterprise Routing and Switching track, which focuses on the technologies used in typical business and campus networks. This track progresses through Specialist (JNCIS), Professional (JNCIP), and ultimately to the highly coveted Expert (JNCIE) level.
Other available tracks cater to different industry needs. The Service Provider Routing and Switching track is designed for engineers working in large internet service provider environments. The Junos Security track focuses on Juniper's suite of firewall and security products, validating skills in protecting network infrastructure. Additionally, specialized tracks exist for areas like Data Center design, automation, and cloud networking. This structured but flexible program allows individuals to build upon their foundational JNCIA-Junos knowledge and cultivate a deep level of expertise in their chosen domain, providing a clear roadmap for long-term career development.
Setting the Stage for Success
Preparing for the JNCIA-Junos exam requires a structured and methodical approach. The first step for any candidate should be to download and thoroughly review the official exam objectives provided by Juniper Networks. These objectives are a detailed blueprint of all the topics that may appear on the exam. They allow you to organize your study plan, identify areas where you have existing knowledge, and pinpoint the concepts you need to focus on. Ignoring the exam objectives is a common mistake that can lead to misallocated study time and an incomplete understanding of the required material.
Once you are familiar with the topics, the next phase involves gathering quality study resources. This can include official courseware, study guides, and video training series designed specifically for the exam. However, theoretical knowledge alone is not enough. The most crucial element of preparation is hands-on practice. Gaining practical experience with the Junos OS command-line interface is essential. This can be achieved through physical Juniper hardware, but more accessibly through virtual labs. Setting up a virtual environment allows you to experiment with configurations, run operational commands, and build confidence in a risk-free setting, solidifying the concepts learned.
A Closer Look at the JNCIA-Junos Exam
The JNCIA-Junos certification is earned by passing a single proctored exam, officially designated by its exam code. The test is designed to be a comprehensive assessment of entry-level skills. Candidates are typically allotted 90 minutes to complete approximately 70 multiple-choice questions. This format requires not only a solid understanding of the subject matter but also effective time management. The questions are carefully crafted to test both theoretical knowledge and the practical application of concepts related to the Junos operating system and fundamental networking principles. It is a closed-book exam, meaning no outside resources are permitted during the test.
To sit for the exam, candidates must register through a designated global testing partner. The cost of the exam can vary slightly by region but is set at a level consistent with other entry-level IT certifications. It is important to approach the exam with a strategy. Pacing is key; with about 75 seconds per question on average, it is wise to answer the questions you are confident about first and mark more challenging ones for review later. The passing score is not always publicly disclosed and can be subject to change, so the best approach is to aim for a comprehensive mastery of all exam objectives.
Dissecting Exam Objectives: Networking Fundamentals
The Networking Fundamentals portion of the JNCIA-Junos exam objectives establishes the baseline of knowledge required. This domain ensures that a candidate understands the universal principles that govern all network communication, before layering on Juniper-specific details. Topics within this section include the OSI model and the TCP/IP protocol suite. You will be expected to know the purpose of each layer, the protocols that operate at different layers, and how data is encapsulated as it moves down the protocol stack and de-encapsulated as it moves up. This knowledge is essential for troubleshooting any network issue.
This domain also covers IP addressing in depth, including the different classes of IP addresses, private versus public address space, and the critical skill of subnetting. Candidates must be able to break down a given network address into smaller, usable subnets. Furthermore, the objectives cover the basics of Ethernet, including frame structure and the types of network devices like hubs, switches, and routers. You must understand the difference between a collision domain and a broadcast domain and be able to identify how different devices segment a network, which is a foundational concept in network design and performance.
Junos OS Fundamentals Deep Dive
This is a critical domain of the exam, as it moves from general theory to the specific architecture of the Juniper operating system. A key concept tested here is the separation of the control plane and the forwarding plane. You will need to understand the distinct roles of each plane: the control plane runs the routing protocols and builds the routing table, while the forwarding plane uses that information to move packets at high speed. This section also explores the flow of traffic through a Junos device, from ingress port to egress port, and the processing that occurs along the way.
Candidates must be familiar with the software architecture of Junos OS. This includes knowing that it is based on the FreeBSD operating system and understanding the function of core processes and daemons. The concept of a single source code base and a single software release train across different platforms is also an important part of this objective. The exam will validate your understanding of how this unified software approach provides consistency and simplifies network operations. Grasping these architectural principles is key to understanding why Junos devices are known for their stability and performance under pressure.
Mastering the User Interfaces
A significant portion of the JNCIA-Junos exam is dedicated to the practical skills needed to interact with a Junos device. The primary user interface is the command-line interface (CLI), and candidates must be proficient in its use. This includes understanding the two main operational modes: operational mode and configuration mode. Operational mode is used for monitoring and troubleshooting, allowing you to view the current state of the device. Configuration mode is where you make changes to the device's setup. You must know the commands to switch between these modes, such as configure and exit.
Within the CLI, you must be familiar with common commands and navigation techniques. This includes using commands like show to display information, monitor to view real-time logs, and ping and traceroute for basic connectivity testing. You should also be comfortable with CLI features that enhance usability, such as tab completion, command abbreviations, and using the question mark for help. While the CLI is the main focus, the exam objectives also cover the basics of the J-Web graphical user interface, so a conceptual understanding of how to perform basic configuration and monitoring tasks via the web interface is also required.
Junos Configuration Basics Explained
The unique hierarchical structure of the Junos OS configuration is a core topic on the exam. Unlike the flat configurations found in some other network operating systems, Junos organizes its configuration into a tree-like structure of statements and containers. You must understand this hierarchy and be able to navigate it to view and modify settings. A critical aspect of this is the distinction between the candidate configuration and the active configuration. Changes are made in a copy called the candidate configuration, which is then verified and applied to the active, running configuration.
This process is managed by the commit command. The exam will test your knowledge of the commit model, including the importance of running a commit check to validate syntax before applying changes. You will also need to know how to use the rollback command, a powerful feature that allows you to revert the device's configuration to a previous state, which is invaluable for recovering from configuration errors. Understanding how to load, save, and manage configuration files, as well as the syntax for basic configuration tasks like setting a hostname or IP address, is absolutely essential.
Operational Monitoring and Maintenance
A network professional spends a significant amount of time monitoring the health and status of network devices, and the JNCIA-Junos exam reflects this reality. This domain focuses on the commands and procedures used to perform day-to-day operational tasks. You must be proficient with a wide range of show commands to check the status of system hardware, interfaces, and routing protocols. For example, you should know how to use show interfaces terse to get a summary of all network interfaces and their status, or show chassis alarms to check for any hardware issues.
This section also covers basic maintenance tasks. This includes the procedures for properly shutting down and rebooting a Junos device. You will need to understand the different log files the system maintains, such as the messages file, and how to use the show log command to view them for troubleshooting purposes. Knowledge of network utilities like ping, traceroute, and telnet as they are implemented within the Junos OS is also required. These tools are fundamental for verifying network reachability and diagnosing connectivity problems, making them a key part of the operational skill set.
Preparing for Exam Day
Success on exam day depends not just on what you know, but on how well you can perform under pressure. A few weeks before your scheduled exam, it is highly beneficial to take practice tests. These tests help you gauge your readiness, identify any remaining weak areas in your knowledge, and get accustomed to the format and timing of the questions. Analyzing the results of practice exams allows you to fine-tune your final study sessions and focus on the topics where you need the most improvement. Do not just memorize answers; understand the concepts behind each question.
On the day of the exam, ensure you are well-rested and have a clear mind. Read each question carefully, paying close attention to keywords like "not" or "always." Eliminate obviously incorrect answers first to narrow down your choices. If you encounter a particularly difficult question, it is often best to mark it for review and move on. This prevents you from spending too much time on a single question and running out of time for others you might know. By combining thorough preparation with a calm, strategic approach, you can confidently demonstrate your knowledge and earn your certification.
The Heart of the Matter: Routing Fundamentals
Routing is the fundamental process that allows data to travel between different networks, forming the very foundation of the internet and all modern interconnected systems. The JNCIA-Junos exam ensures that candidates have a solid grasp of these core principles. The most basic concept is the distinction between static and dynamic routing. Static routing involves manually configuring paths to destination networks. While simple and secure, it is not scalable for large networks because every route must be explicitly defined by an administrator. It is often used for small, predictable networks or for defining a default route.
Dynamic routing, in contrast, involves using routing protocols to automatically learn about remote networks and determine the best path to reach them. Protocols like OSPF and BGP are examples, though a deep knowledge of their operation is reserved for higher-level certifications. For the JNCIA-Junos, you must understand the purpose of dynamic routing, the concept of an autonomous system, and the difference between interior gateway protocols (IGPs), used within a single administrative domain, and exterior gateway protocols (EGPs), used between different domains. This conceptual knowledge is crucial for understanding how Junos devices participate in a larger network.
Understanding Routing Information and Tables
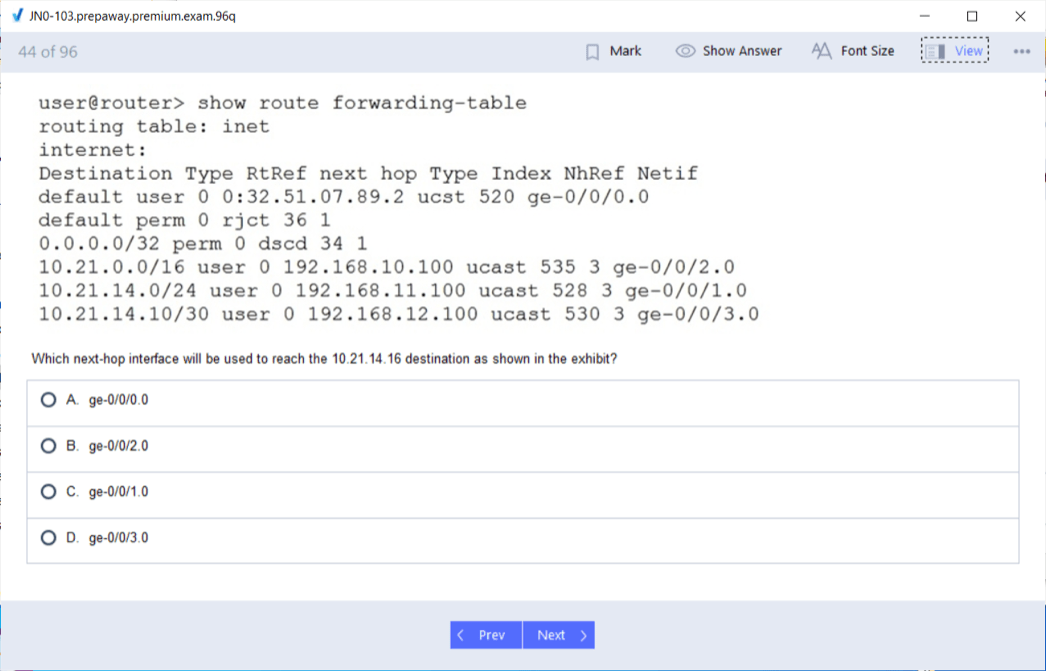
Every router makes its forwarding decisions based on the information stored in its routing table. The Junos OS maintains several routing tables for different purposes, but the primary one for standard IPv4 unicast traffic is called inet.0. The JNCIA-Junos exam requires you to be able to interpret the output of the show route command, which displays the contents of this table. You need to understand the different components of a route entry, including the destination prefix, the next-hop address, the preference value (administrative distance), and the metric associated with the route.
A key concept is how the router selects the best path when multiple routes to the same destination exist. Junos OS uses a specific process for this selection. First, it verifies that the next-hop address is reachable. Then, it selects the route with the lowest preference value. A lower preference indicates a more trustworthy source of routing information; for example, a directly connected network has a preference of 0, while a static route has a preference of 5. If multiple routes have the same lowest preference, the router may use the metric to break the tie, depending on the routing protocol.
Configuring and Monitoring Routing in Junos
Beyond understanding the theory, a certified associate must be able to perform basic routing configuration tasks on a Junos device. The most fundamental of these is the configuration of static routes. You must know the correct syntax within the [edit routing-options] hierarchy to define a static route to a specific destination network. This includes specifying the destination prefix and the next-hop IP address that the router should use to forward traffic for that destination. A common and important use case for static routing is configuring a default route, which tells the router where to send traffic for any destination not explicitly listed in its routing table.
Once routes are configured, monitoring their status is a critical operational task. You will need to be proficient with commands to verify that your routing configuration is working as expected. The primary command for this is show route. You should be able to use this command with specific parameters, such as show route 192.168.1.0/24, to check for a particular route in the table. Understanding how to interpret the output to confirm that a static route is active and present in the forwarding table is a key skill that the exam will validate.
Introduction to Routing Policy
Routing policy is a powerful mechanism that allows network administrators to control and manipulate the information in the routing table. While complex policies are an advanced topic, the JNCIA-Junos exam requires an understanding of the basic concepts and structure. In Junos OS, routing policies are used to control which routes are imported into the routing table from routing protocols and which routes are exported from the routing table to be advertised to other routers. This provides granular control over the flow of routing information throughout the network, which is essential for traffic engineering and security.
A Junos routing policy is composed of one or more terms. Each term contains a from statement, which specifies the match conditions, and a then statement, which defines the action to be taken if the conditions are met. For example, a from statement might match routes based on their source protocol or a specific prefix. The then statement could then specify an action like accept or reject. The exam will test your understanding of this basic structure and how policies are applied. You should be familiar with the default routing policies in Junos, which, for most protocols, is to accept all learned routes.
Controlling Traffic with Firewall Filters
While routing policies control the flow of routing information, firewall filters control the flow of actual data packets. The JNCIA-Junos certification covers the basics of stateless firewall filters. These filters act as access control lists (ACLs), inspecting each packet individually and making a decision to permit or deny it based on a set of configured rules. They are stateless because they do not keep track of the state of connections; each packet is evaluated independently of any that came before it. This makes them very fast and efficient for basic traffic control.
Similar to routing policies, firewall filters in Junos are structured with terms. Each term specifies match conditions in a from statement and an action in a then statement. The from statement can match on various fields in the packet header, such as the source IP address, destination IP address, source port, destination port, and protocol type. The then statement can then specify an action like accept, discard, or reject. The exam will expect you to understand how to construct a simple filter and how to apply it to a logical interface in either the inbound or outbound direction to control traffic.
Switching Fundamentals in the Juniper World
Although the JNCIA-Junos certification has a strong emphasis on routing and the operating system itself, it also touches upon fundamental Layer 2 switching concepts. This is because many Juniper devices, particularly those in the EX series, are high-performance Ethernet switches. Candidates are expected to understand the purpose and basic operation of virtual LANs (VLANs). VLANs are used to segment a physical network into multiple logical broadcast domains, which improves security and network efficiency. You should understand that devices in different VLANs cannot communicate directly without a Layer 3 device, like a router, to route between them.
The exam objectives cover the basic configuration of interfaces on a Juniper switch. This includes understanding the difference between an access port, which belongs to a single VLAN and typically connects to an end-user device, and a trunk port, which can carry traffic for multiple VLANs and is used to connect to other switches. You should be familiar with the Junos OS configuration hierarchy for defining VLANs and assigning interfaces to them. This foundational switching knowledge is essential for anyone who will be working in an enterprise campus or branch environment where Juniper switches are deployed.
Practical Scenarios and Problem Solving
To truly master the topics for the JNCIA-Junos exam, it is important to move beyond memorization and apply the concepts to practical scenarios. Consider a simple network with two separate office segments that need to communicate through a Juniper router. You should be able to mentally walk through the required configuration steps. This would involve assigning IP addresses to the router's interfaces, ensuring they are in the correct subnets for each office segment. Then, you would need to consider how the end-user devices in each office would know how to reach the other segment.
This scenario highlights the need for routing. The Juniper router would automatically have connected routes for its own interfaces. For the client devices, you would configure their default gateway to be the IP address of the router's interface on their respective segment. Now, imagine you need to prevent the accounting department's segment from accessing a specific server in the engineering segment. This is where a firewall filter would be applied. You would create a filter that denies traffic from the accounting source IP range to the engineering server's destination IP and apply it to the appropriate interface to enforce the policy.
Translating Certification into a Career
Earning the JNCIA-Junos certification is a significant accomplishment, but its true value lies in its ability to launch and accelerate a career in network technology. This credential serves as a formal validation of your foundational skills, making you a more attractive candidate to employers. The roles most directly associated with this certification are those that involve the day-to-day operation and management of network infrastructure. A Network Administrator, for example, is responsible for maintaining the health and stability of an organization's internal network, including configuring switches, routers, and firewalls, and troubleshooting connectivity issues. The JNCIA-Junos provides the exact skills needed for such a role in a Juniper environment.
Another common role is that of a Network Engineer. While administrators often focus on maintenance, engineers are typically more involved in the design, implementation, and upgrading of network infrastructure. An entry-level engineer might be responsible for deploying new equipment at a branch office, implementing routing changes, or assisting senior engineers with larger projects. The JNCIA-Junos certification demonstrates that you have the prerequisite knowledge of routing fundamentals and Junos configuration basics to contribute effectively to an engineering team from day one, reducing the amount of on-the-job training required.
Exploring Entry-Level Networking Positions
For those just starting their careers, the JNCIA-Junos can open the door to several key entry-level positions. One of the most common starting points is a role as a NOC Technician or Network Operations Center Technician. In a NOC, technicians are responsible for monitoring the health of the network on a 24/7 basis. They respond to automated alerts, perform initial troubleshooting of outages, and escalate complex issues to more senior engineers. This role provides invaluable experience in operational monitoring and fault diagnosis, skills that are directly covered by the JNCIA-Junos exam objectives.
Another excellent starting point is a position in technical support, often as a Technical Support Engineer. In this role, you would work for a vendor, managed service provider, or large enterprise, helping customers or internal users resolve their networking problems. This requires strong problem-solving skills and a solid understanding of networking fundamentals and device configuration, as you would guide customers through troubleshooting steps over the phone or via email. The JNCIA-Junos provides the credibility and foundational knowledge necessary to succeed in such a demanding and educational role.
The Salary Landscape: A Realistic View
Compensation is a significant factor in any career decision. While salaries can vary widely based on geographic location, years of experience, and the size and type of the employing company, industry data provides a helpful baseline. For individuals holding a JNCIA-Junos certification, entry-level positions typically offer a competitive salary that reflects the specialized skills the credential represents. According to data from various salary aggregation services, a certified professional can expect an average starting salary that is notably higher than general entry-level IT roles, often falling in the range of $56,000 to $58,000 per year.
As an individual gains experience, this potential for earnings grows substantially. A network administrator or engineer with a few years of hands-on experience and a JNCIA-Junos certification can see their salary increase significantly. Senior-level roles, such as Senior Network Engineer, which may still have the JNCIA-Junos as a foundational part of their skill set, can command salaries well over $100,000. It is important to view the certification not as a guarantee of a specific salary, but as an investment that increases earning potential over the entire course of a career by opening doors to higher-skilled, in-demand positions.
Building a Compelling Resume
Once you have earned your certification, it is crucial to showcase it effectively on your resume. The JNCIA-Junos certification should be featured prominently in a dedicated "Certifications" section. Be sure to list the full name of the certification: Juniper Networks Certified Associate - Junos (JNCIA-Junos). It is also good practice to include your certification ID or a verification link if you are comfortable doing so, as this allows potential employers to quickly confirm your status. This immediately signals to recruiters and hiring managers that you have a verified skill set.
Beyond just listing the credential, you should integrate the skills it represents into the "Skills" and "Experience" sections of your resume. Instead of simply stating that you have the certification, use bullet points to describe what you can do with that knowledge. For example, under your skills, you could list "Junos OS Configuration and Management" or "Static Routing and Firewall Filter Implementation." In your experience section, describe how you have applied these skills in previous roles or lab projects. This provides concrete evidence of your capabilities and brings your certification to life for the reader.
Essential Soft Skills for Network Professionals
Technical proficiency is the price of admission for a networking career, but long-term success often depends on a well-developed set of soft skills. Communication is paramount. Network professionals must be able to clearly explain complex technical issues to both technical and non-technical audiences. Whether you are writing a report on a network outage for management or walking a user through a connectivity problem, clarity and patience are essential. The ability to document your work, creating clear network diagrams and configuration guides, is also a critical communication skill that ensures the smooth operation of a team.
Problem-solving is another vital soft skill. Networking is often about troubleshooting; it requires a logical, methodical approach to diagnosing and resolving issues. You must be able to analyze a problem, form a hypothesis about the cause, test that hypothesis, and implement a solution, all while under pressure. This is often a collaborative effort, so the ability to work effectively as part of a team is crucial. Sharing knowledge, accepting feedback, and coordinating actions with other IT professionals are all necessary for maintaining a complex and reliable network infrastructure.
Interview Preparation for JNCIA-Certified Candidates
Having the JNCIA-Junos on your resume will likely lead to technical questions during a job interview. Be prepared to discuss the core concepts of the certification. An interviewer might ask you to explain the difference between the control plane and the forwarding plane in a Junos device. They could ask you to describe the process of making and committing a configuration change. You should be ready to explain the purpose of a static route or a firewall filter and provide a simple use case for each. Your ability to articulate these concepts clearly will demonstrate a true understanding of the material.
In addition to conceptual questions, you may be asked some basic, practical questions. An interviewer might say, "What command would you use to see all the interfaces on a device and their status?" The expected answer would be show interfaces terse. They might also ask, "How would you return the configuration to its previous state if you made a mistake?" The correct answer is the rollback command. Preparing for these types of questions by reviewing your study notes and practicing in a lab environment will help you feel confident and make a strong impression during the interview process.
From Junior to Senior: A Career Progression Path
The JNCIA-Junos is the first step on a long and rewarding career path. A typical progression starts in a junior role, such as a NOC technician or junior administrator. In these positions, you will apply your foundational knowledge and gain invaluable hands-on experience. As you become more proficient, you will take on more responsibility, perhaps moving into a Network Administrator or Network Engineer role. At this stage, you will be responsible for managing and implementing changes on the live network and will begin to specialize in certain technologies.
From there, the path leads to senior roles. A Senior Network Engineer is a subject matter expert, responsible for designing complex network solutions, leading major projects, and mentoring junior staff. To reach this level, continuous learning is essential. This often involves pursuing higher-level certifications, such as the Juniper JNCIS and JNCIP, to gain a deeper understanding of advanced routing protocols and network design principles. The JNCIA-Junos provides the solid foundation upon which this entire structure of advanced knowledge and career progression is built, making it a critical first milestone.
JNCIA-Junos certification practice test questions and answers, training course, study guide are uploaded in ETE files format by real users. Study and pass Juniper JNCIA-Junos certification exam dumps & practice test questions and answers are the best available resource to help students pass at the first attempt.


